Trusted by:
Professional Certificate Printing Guide
Learn how to meet the requirements of professional certificate printing. Simple steps and tips on how to get quality printed designs that don't miss a thing.
AuthorSergey Butko
Updated: July 12, 2023
7 min read
Author
Sergey Butko
Updated: July 12, 2023
7 min read
Trusted by:
You prepared the certificate design, and just one last step left – sending it for professional certificate printing. You deliver the certificate to the printing shop and… Apparently, the project is rejected, as it lacks margins and bleeds.
What if you could get the design ready in a few simple steps? Without sending certificate design back and forth. If you want to take the final certificate step flawlessly, here is a guide.
Why professional certificate printing make a difference?
The print quality is the main reason why professional printing is better than any other. You won’t be able to achieve the same level of precision with an inkjet printer or even a laser printer.
Printing certificates professionally provide you with the highest quality product, which is especially important when it comes to such vital documents as credentials.
High-end printers have all the necessary tools for efficient production – from papers and textures to various finishes. You can give your certificates a final special touch that makes them so unique in the eyes of recipients.
What are the standard requirements for custom certificate printing?
Custom certificate printing service requires that clients provide a digital file of the certificate's design with all essential elements in place. It’s all about the desired output. Professional printing shops won't take on printing a poorly prepared design. Their goal is to guarantee that they can provide the best service.
Paper size
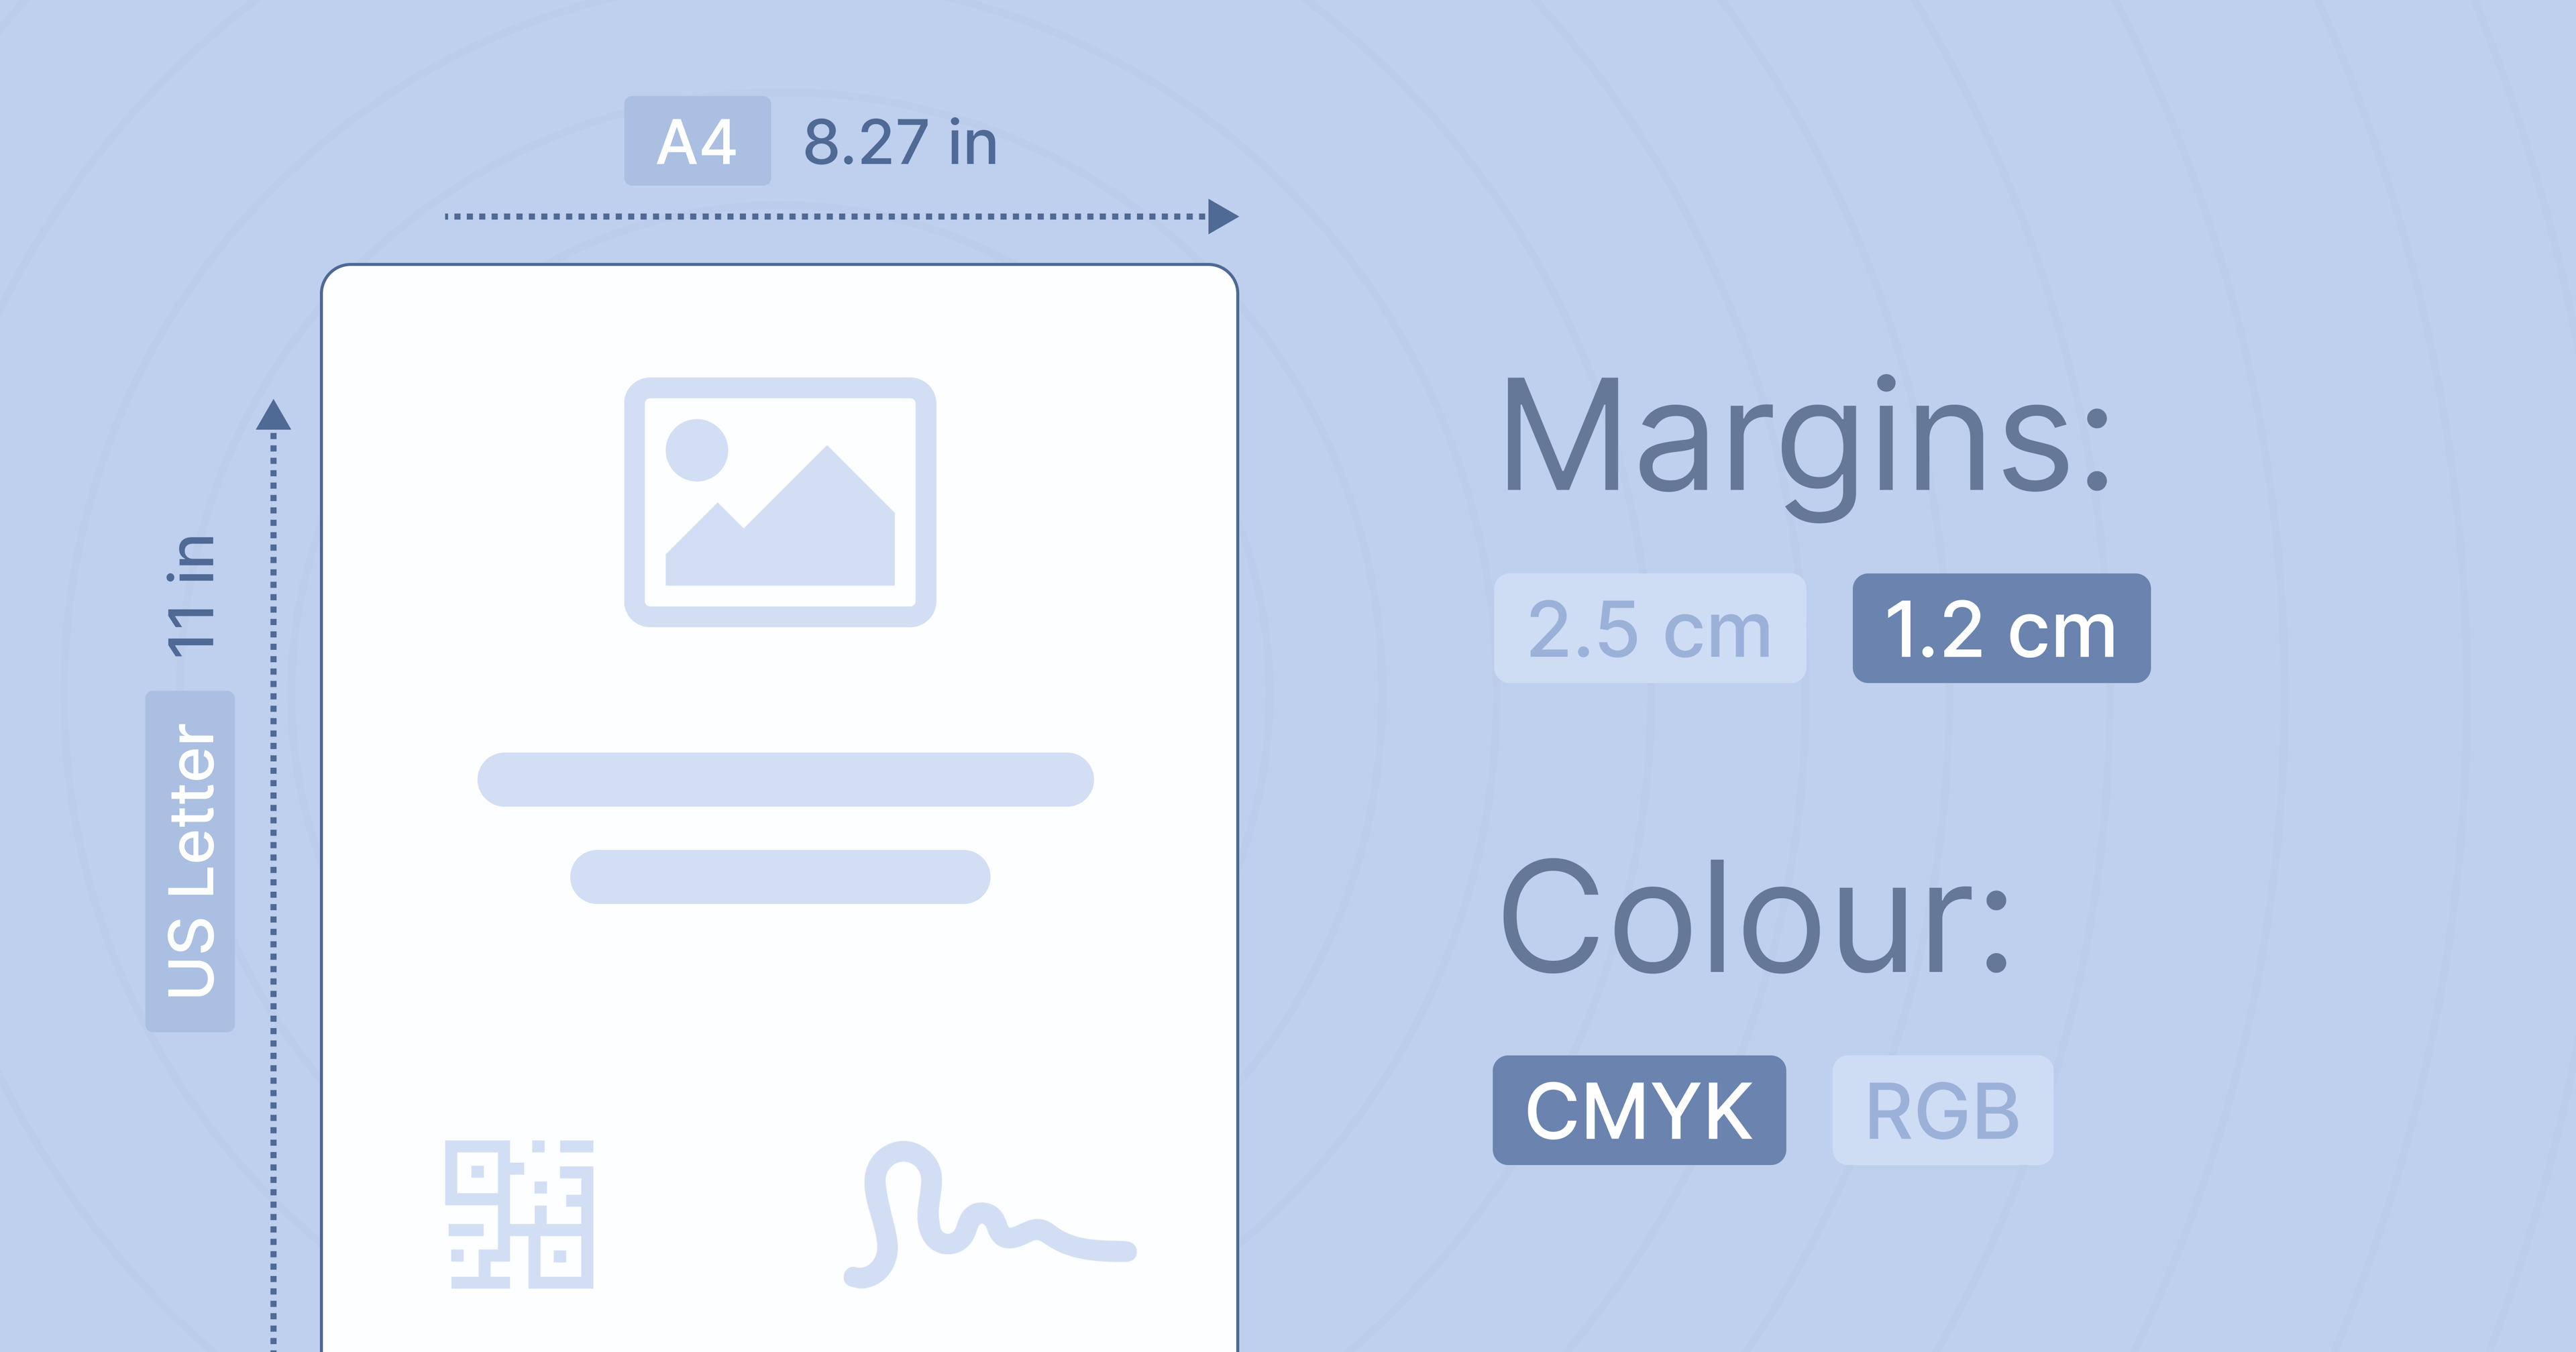
Standard size certificate paper includes Letter size (8.5 x 11 inches) and A4 size (220mm x 280mm). Popular are both orientation paper options – landscape and portrait.
Color mode
When submitting a design, save it in CMYK color printing, as some printing shops may require files to be in these primary colors for printing out correctly. RGB colors are not always guaranteed when converted into CMYK for production.
Fonts and text
If the printing shop doesn't have a particular font, their programs will automatically replace your beautiful font with the standard one. Convert all the fonts used in the graphics program to curves to prevent any font-related issues.
Bleed area
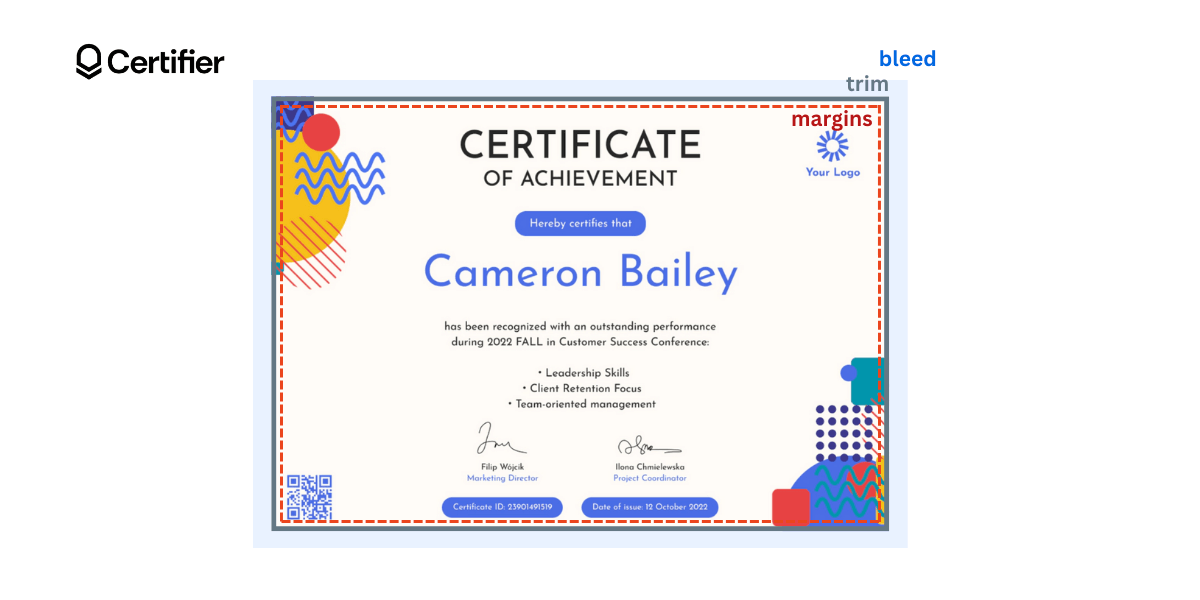
Include a bleed area to guarantee that the design extends beyond the trim edges, allowing for precise trimming during the printing process (dimensions required may vary between the printing shops).
Safety margin
Keep a safety margin of at least 0.150 inches (3.81mm) from the trim area to prevent any important information or design elements from being accidentally trimmed off.
File format
Preferred file formats for submission may include PDF or TIFF, as they are widely compatible and printer-friendly.
Resolution
Set the final resolution of your artwork to 300 dpi for a high-quality printing result. In this way, text and graphics remain clear and sharp when printed.
7 Simple steps to prepare a certificate design for professional print
Let's walk you through preparing your design for professional printing. Regardless of your graphic design skills, we show you how to cover all the details without much effort.
#1 Choose a template or create your own certificate from scratch
To guarantee the highest printing quality, choose the template from a reliable source. For example, the Certifier template library provides expertly designed certificate templates that you can easily download to the format you need.
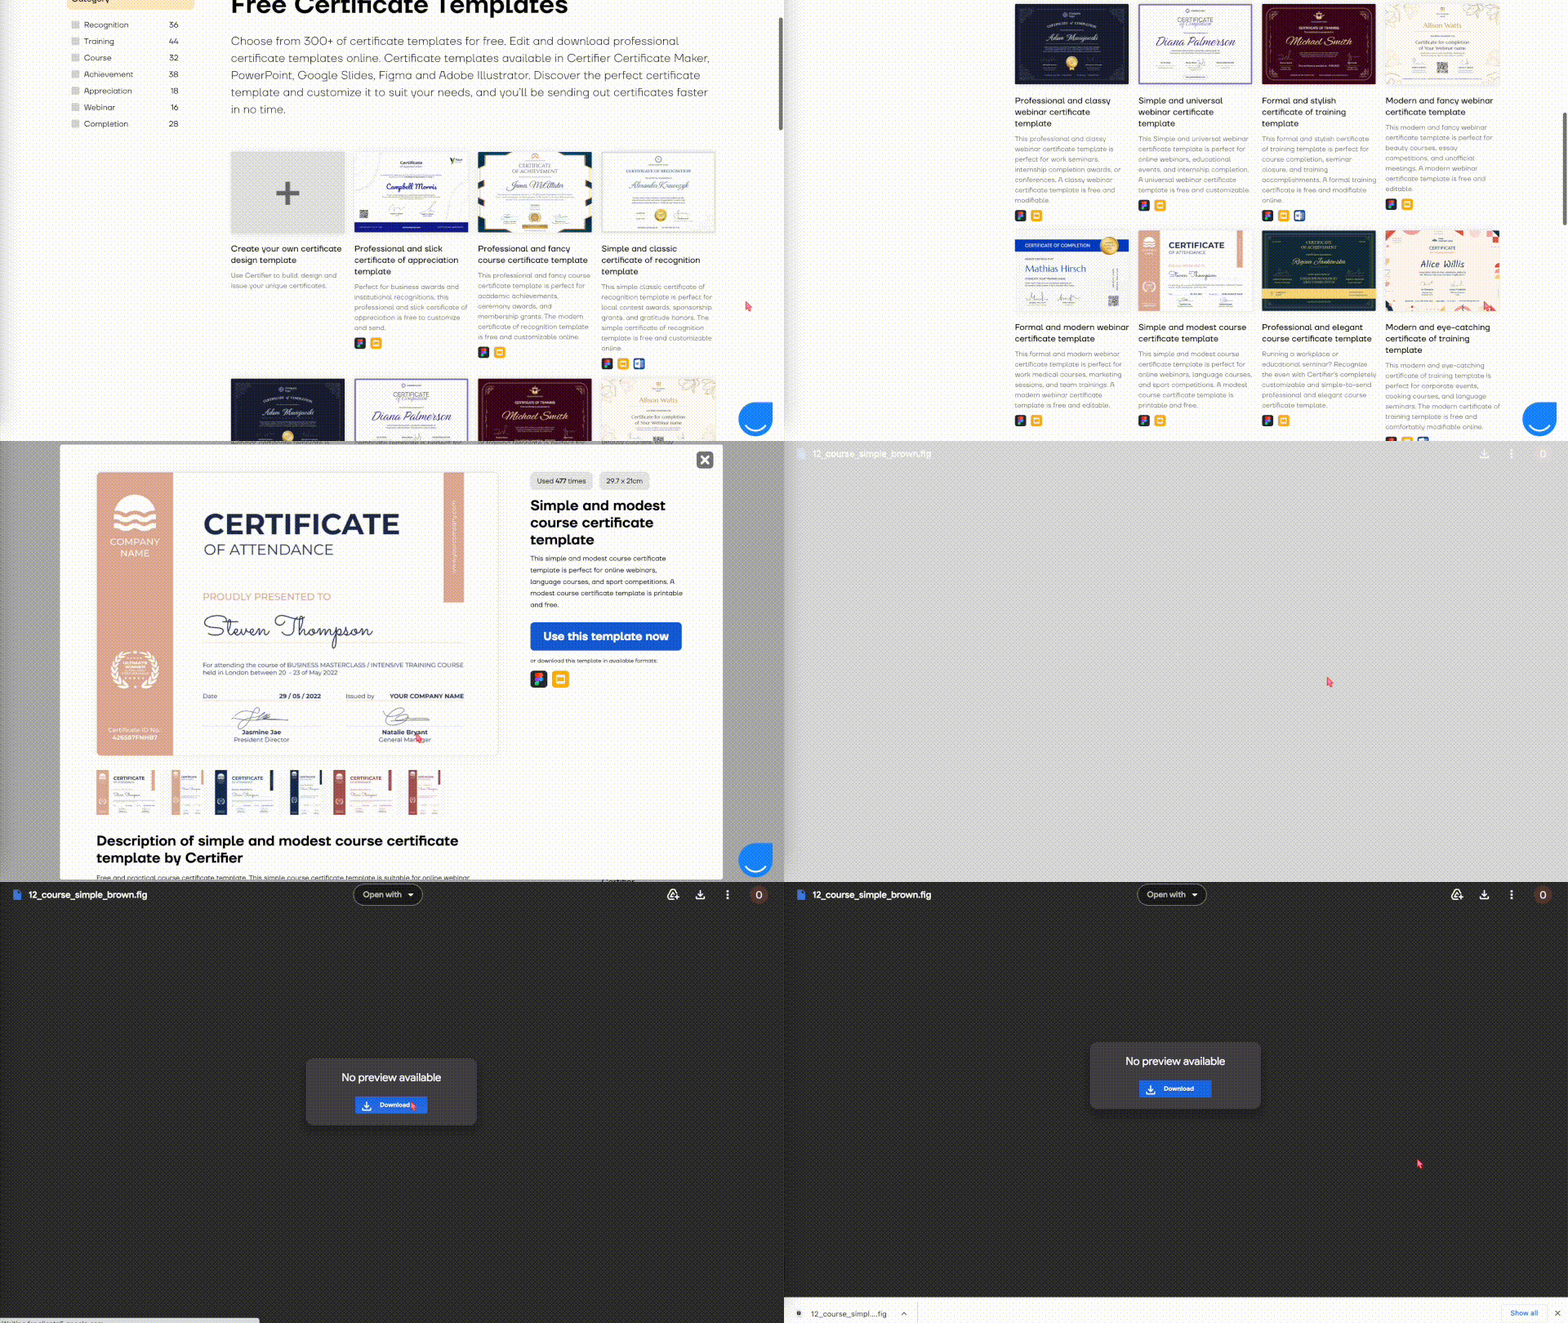
Tip! Certifier certificate maker provides a comprehensive built-in templates editor, so if you want to make multiple certificates faster, check this out (it’s free!).
#2 Open the file in Figma
Figma is one of the few that provides so extensive graphic editing options for free. For that reason, we will prepare the certificate for professional printing with it.
Open the downloaded file in Figma to make the process as simple as possible. Click Import at the top right corner of the main Figma dashboard and choose the file.
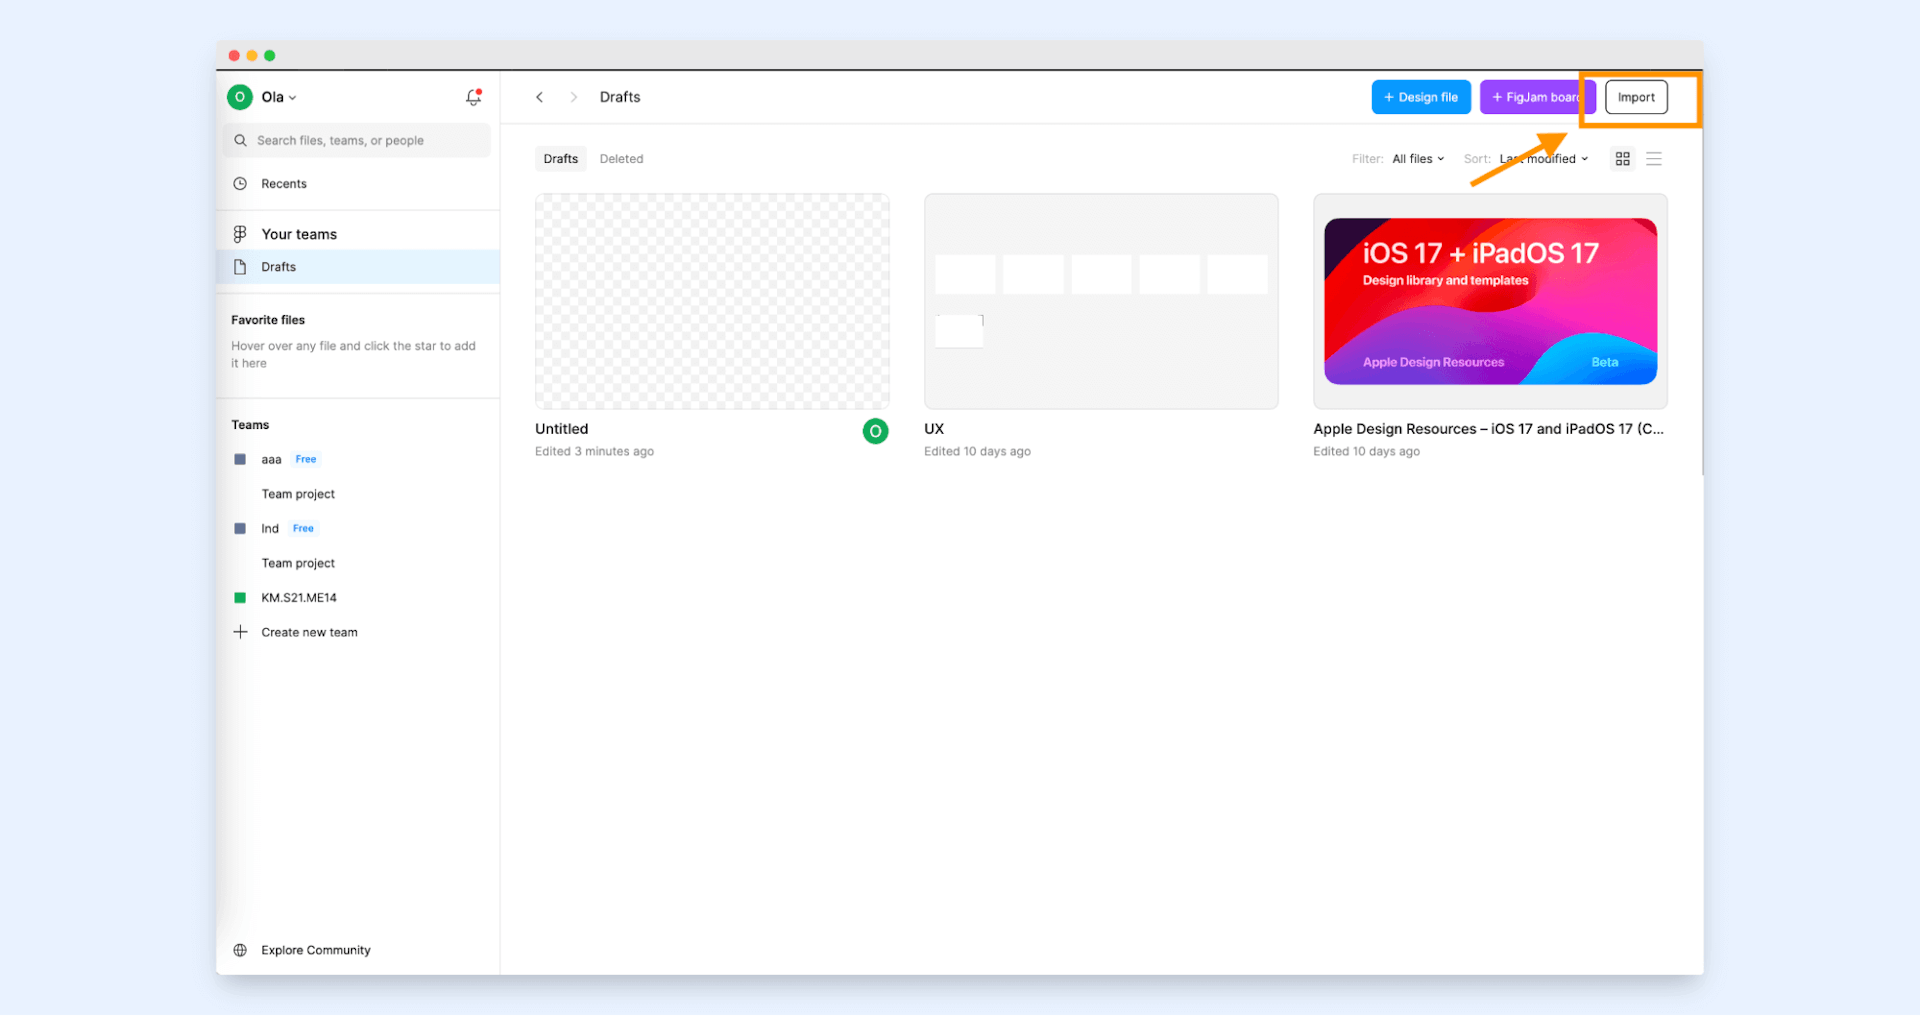
If you want to create your own design, just open a new Design File and create a new Section with the appropriate dimensions.
#3 Turn on the Figma plugin
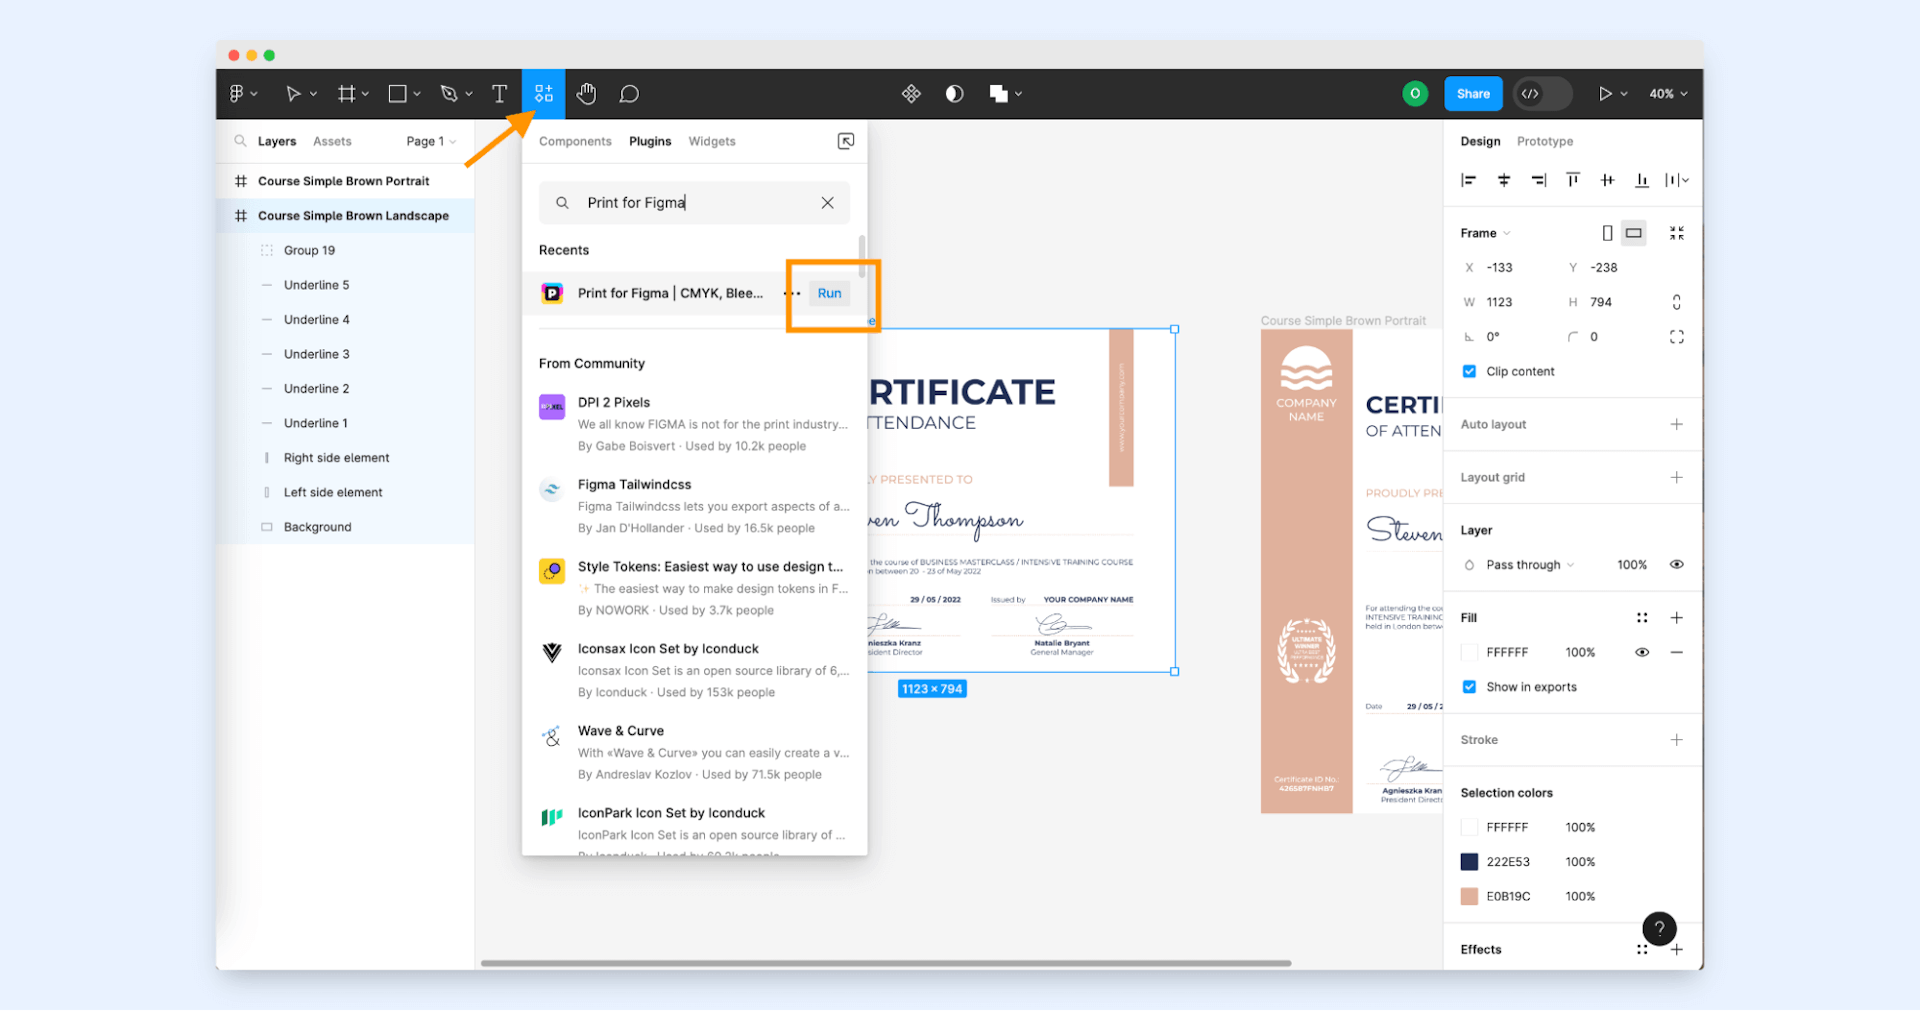
Thanks to the Figma community, the process of preparing the design for printing is pretty straightforward now. Head to Resources > Plugins and type in “Print for Figma” in the search bar.
Click Run and activate the plugin.
#4 Set up the printing requirements
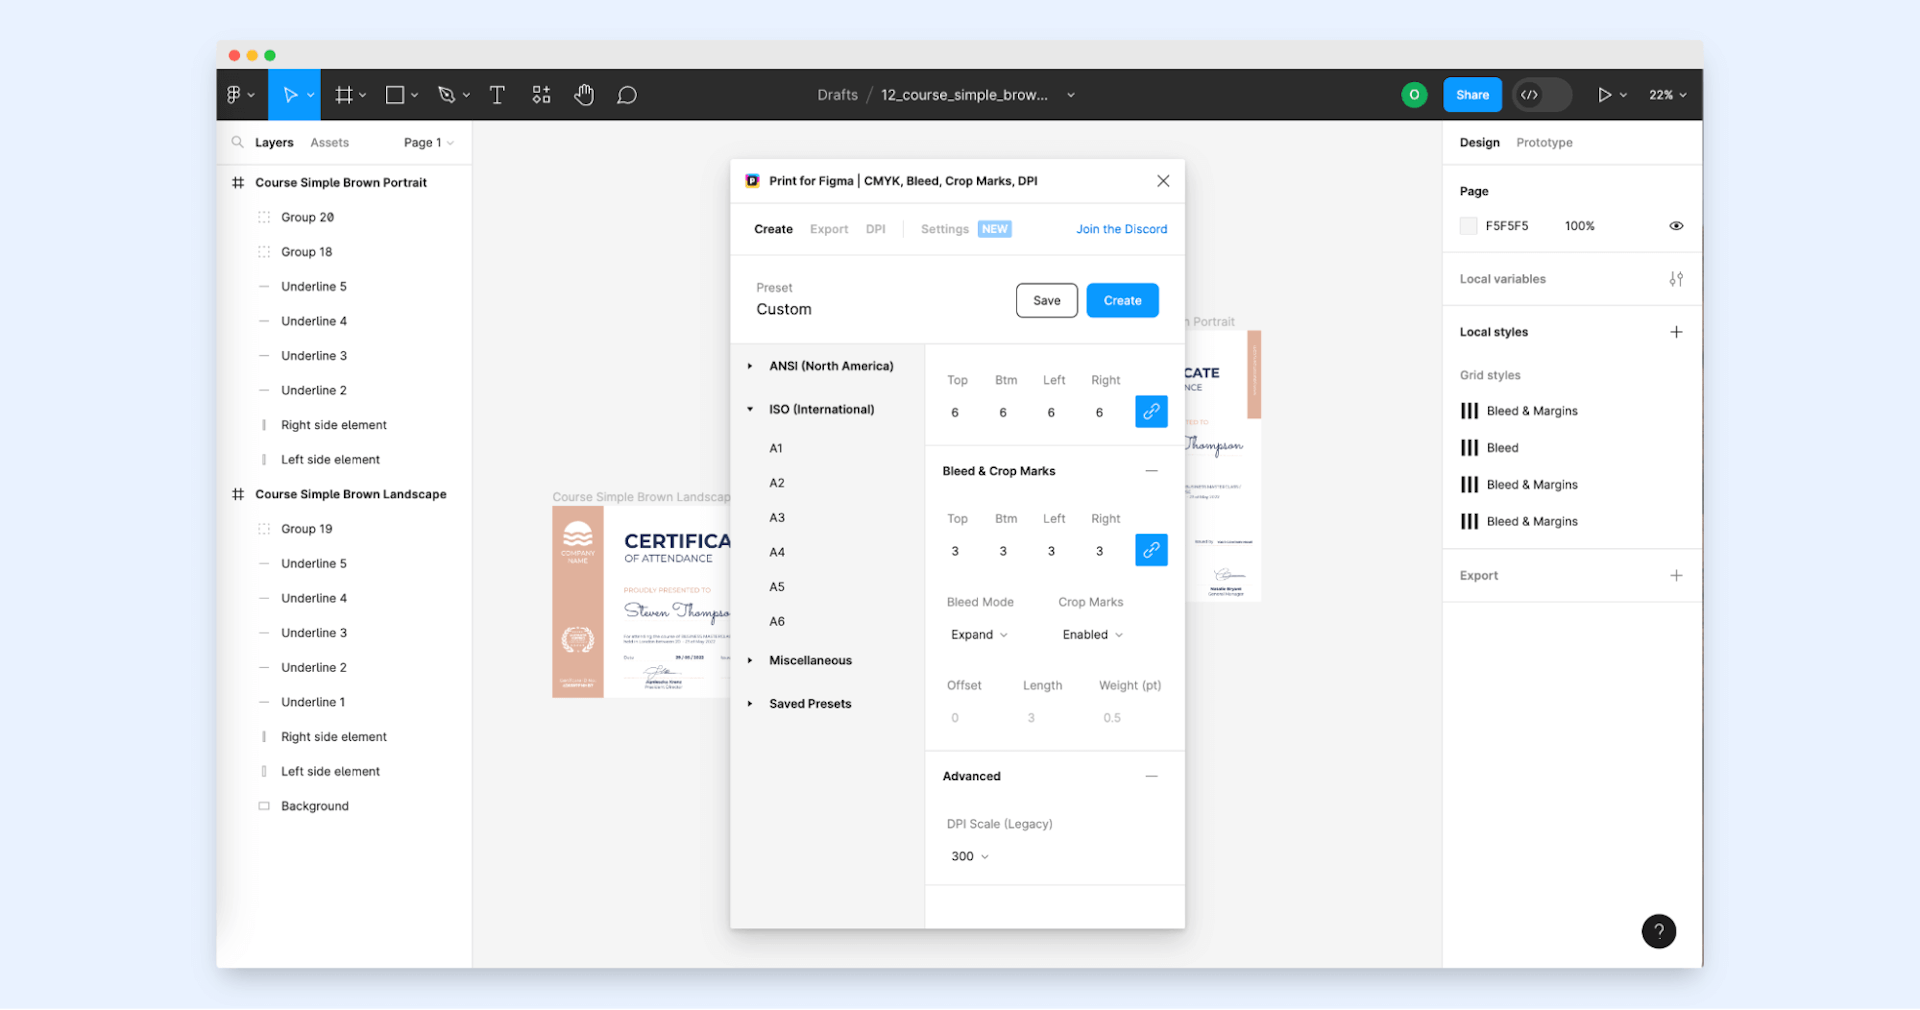
Now is the time to set up all the dimensions. Choose paper size, margins, bleed, and crop marks, as well as a 300 dpi score. Then, click Create. In just a few clicks, you'll have a new section ready with all the specifications you need.
#5 Convert the project into curves
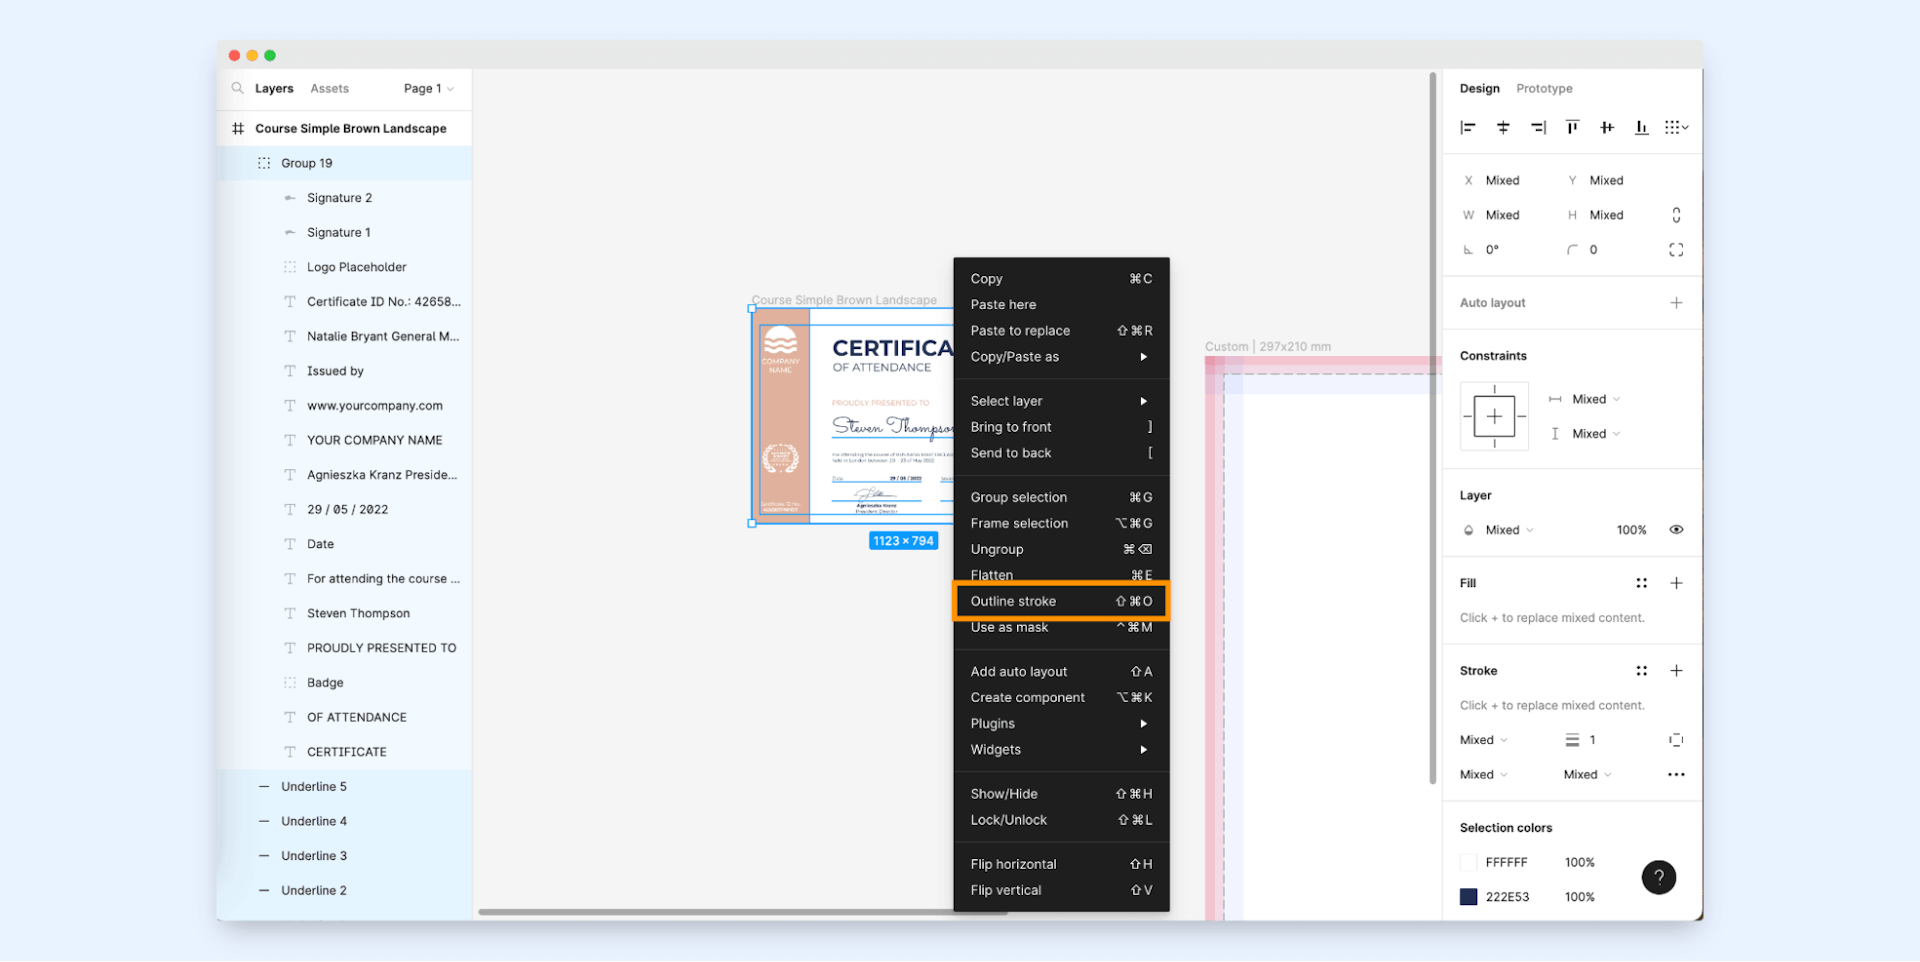
Highlight all certificate elements, and with the right-click, choose Outline Stroke. Thanks to that, after dragging the elements, they will automatically adjust to our new section.
#6 Fit the project to the section with margins and bleeds
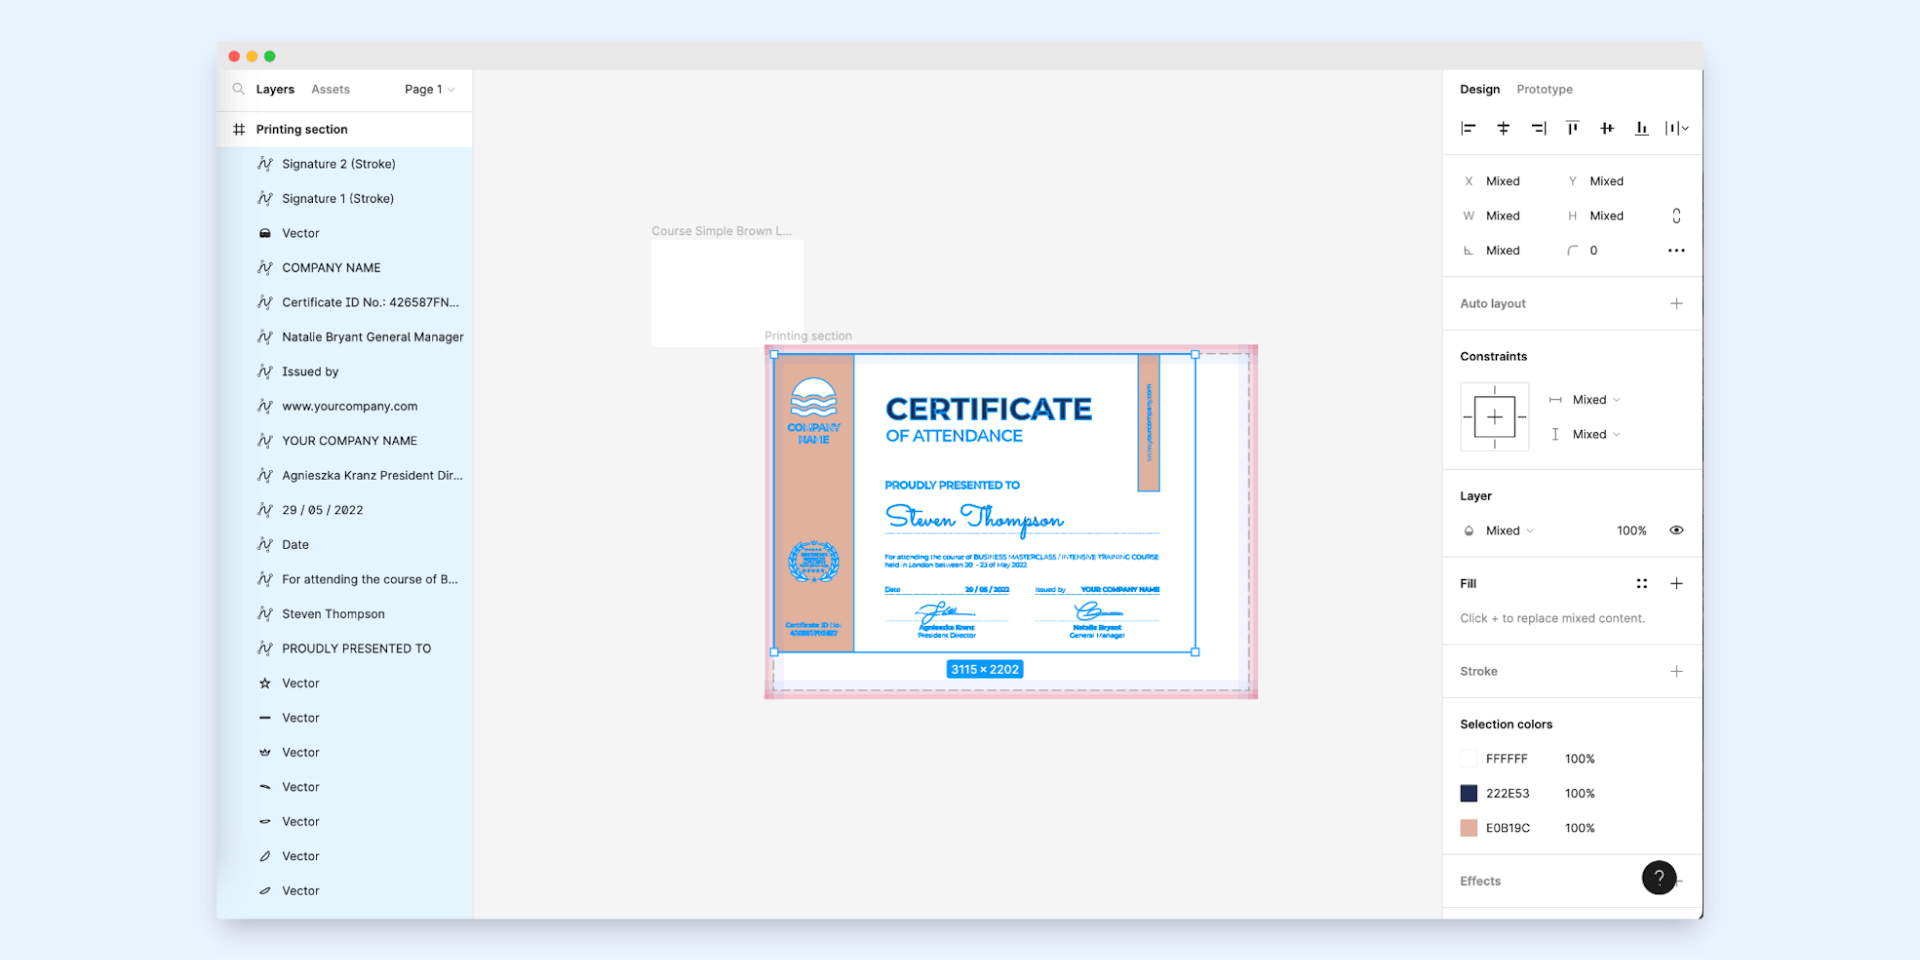
Now drag all certificate elements to the newly created section. Stretch the certificate so that it fills the space exactly to the dotted lines. While stretching, press Shift to prevent distortion of the certificate design.
#7 Export ready file
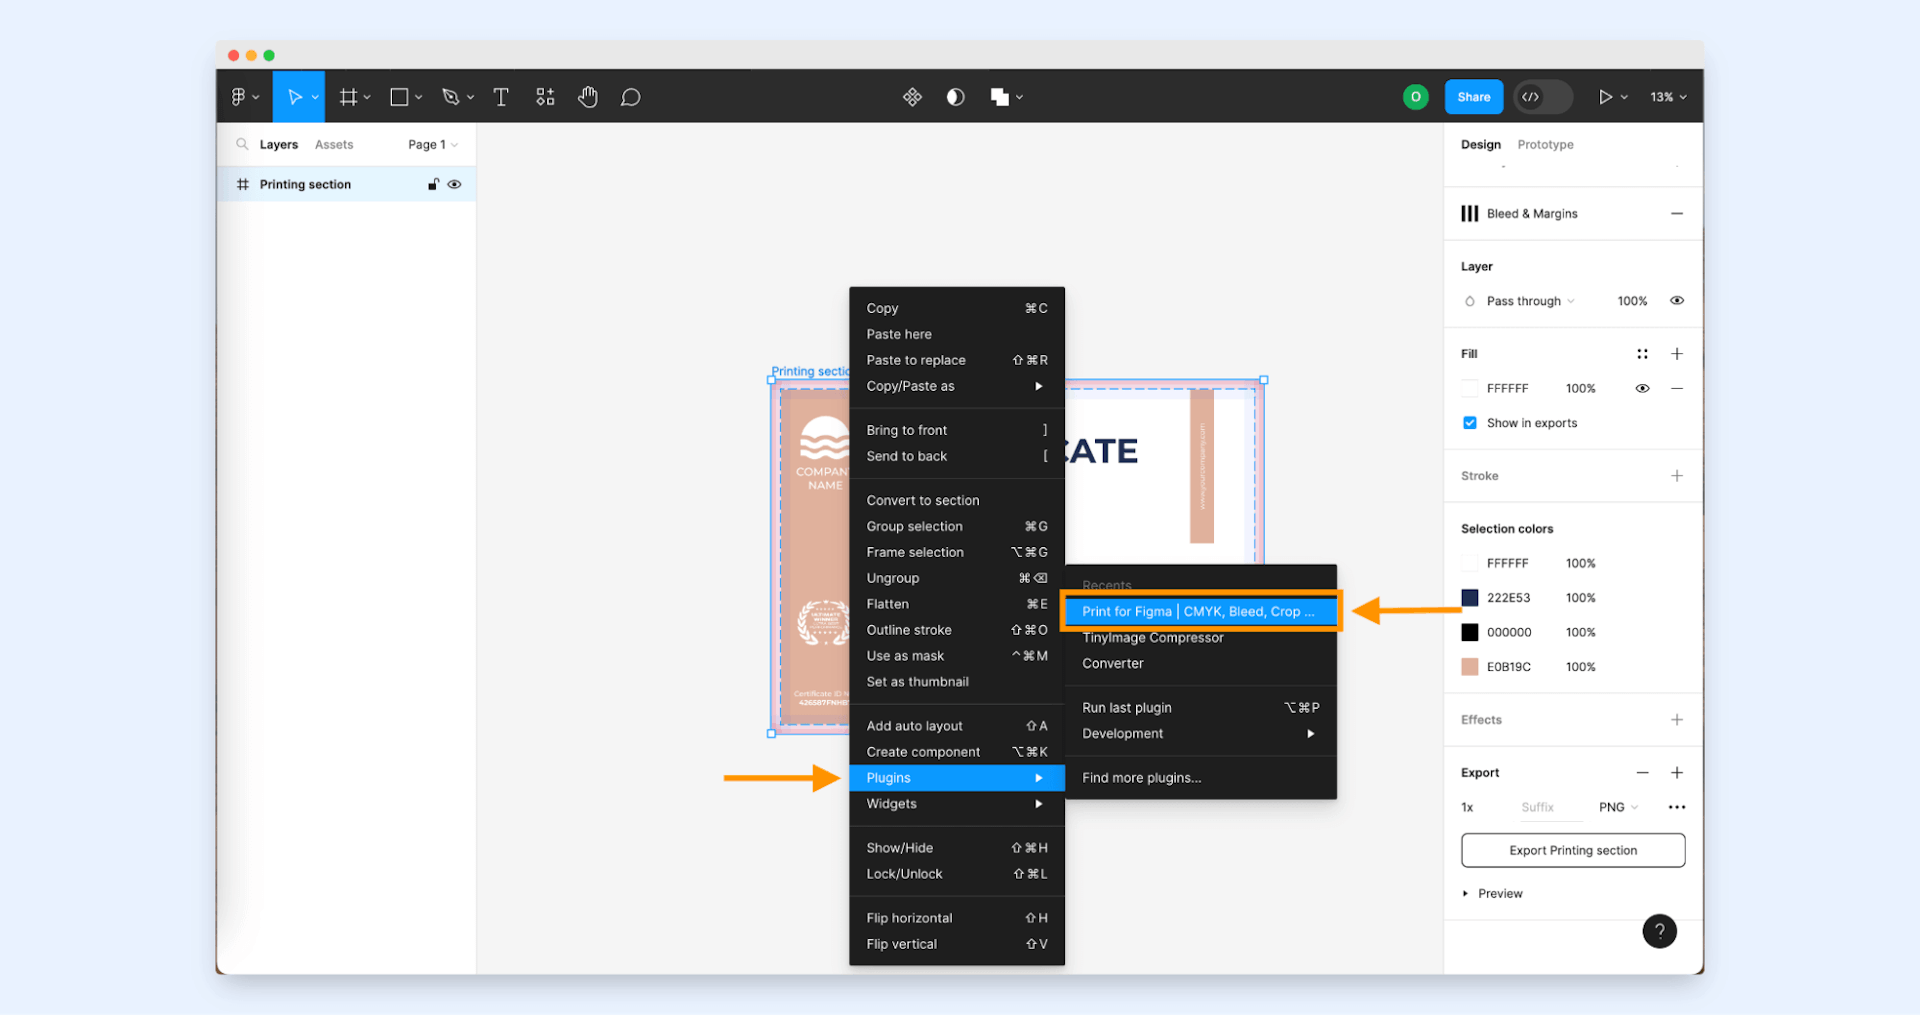
Now your certificate design is ready to be exported. Highlight the certificate you want to export, and with right-click, choose Plugins and then Print for Figma from the list again.
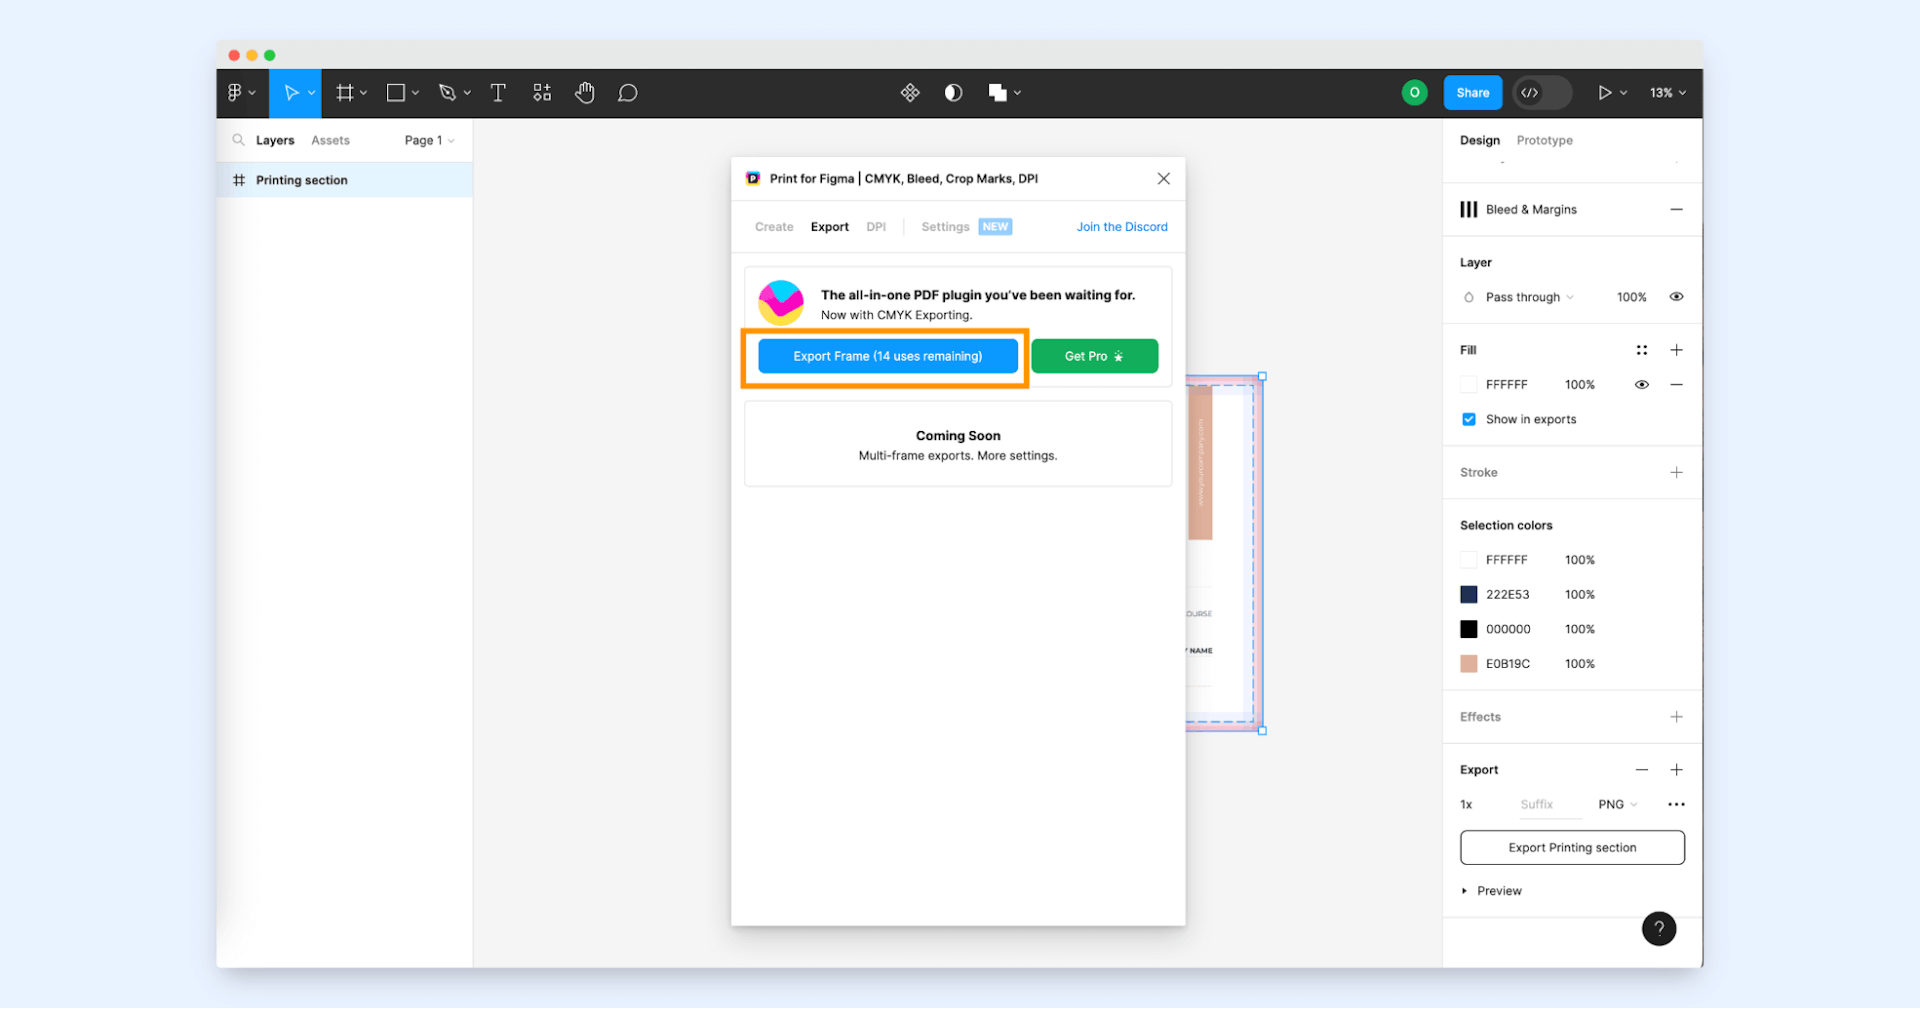
Head to the Export tab. Thanks to that, your certificate will be downloaded in CMYK color mode. Please note that number of free downloads is limited.
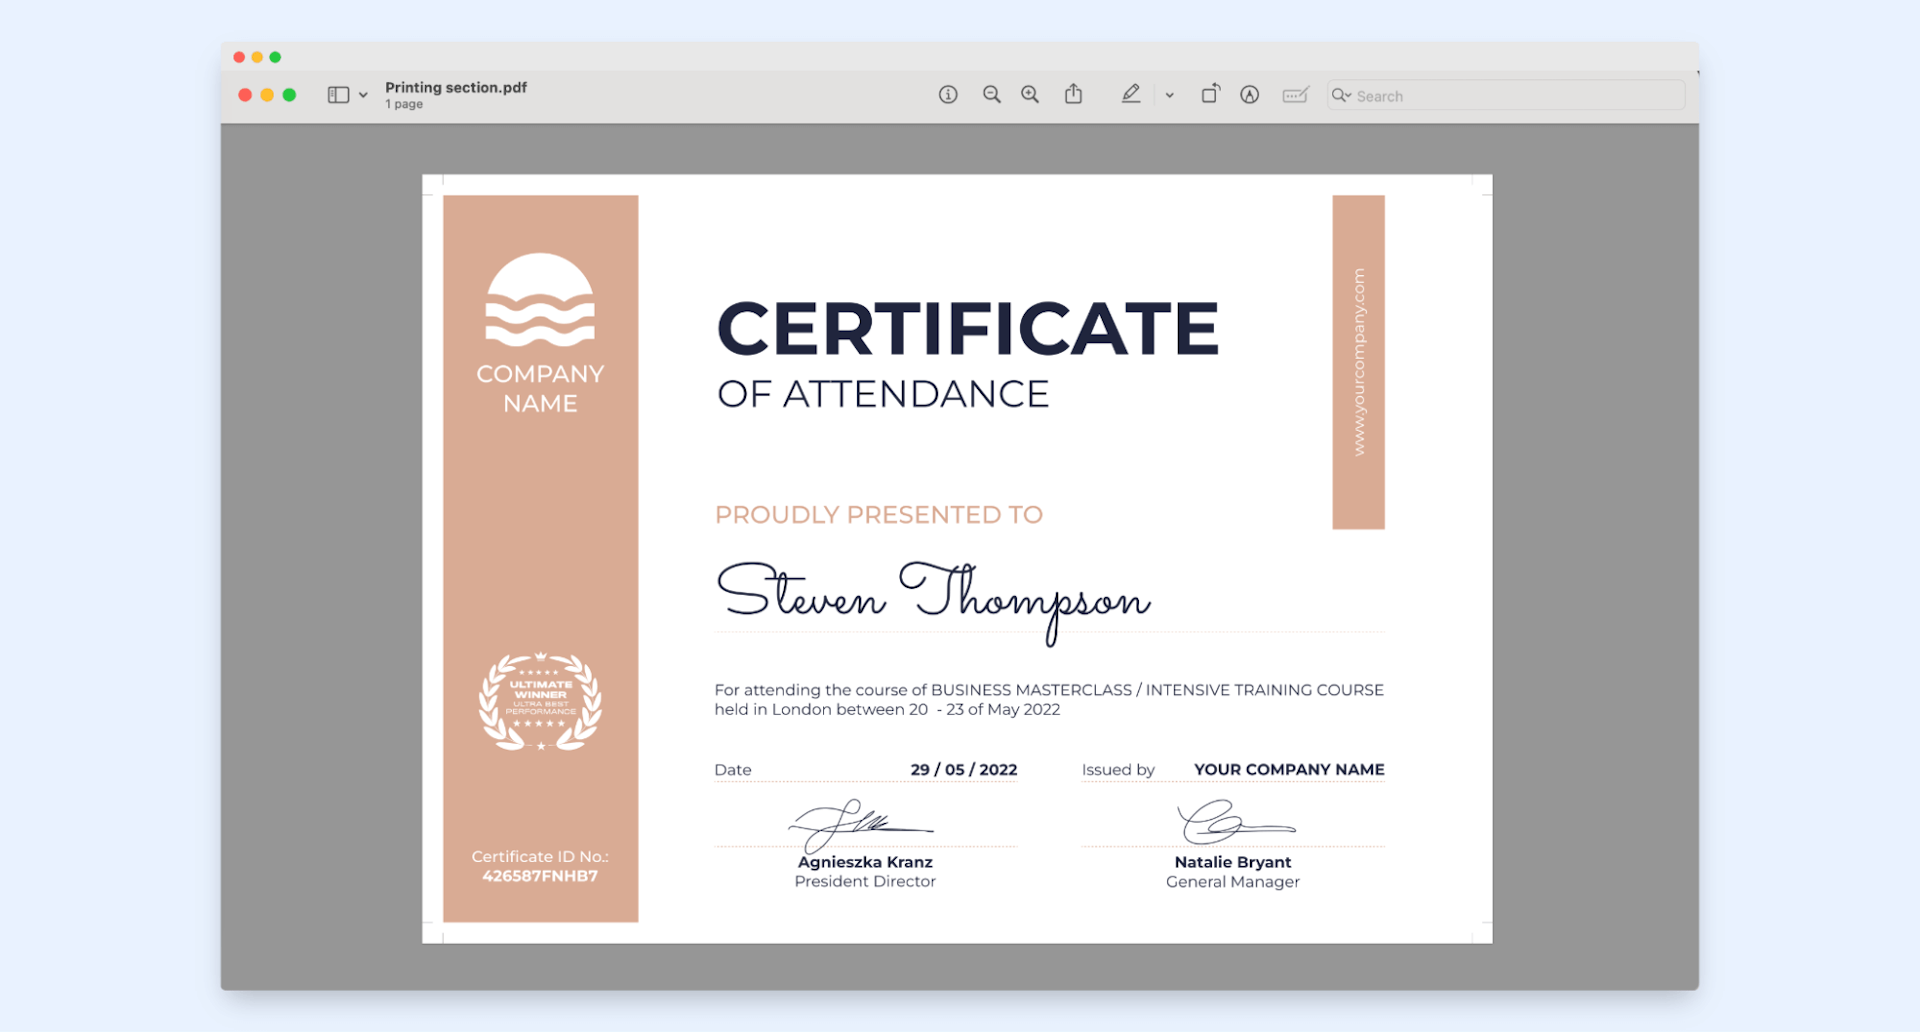
Your certificate is ready for professional printing with crop marks included.
Do you prefer home printing anyway? Check out this guide on how to print certificates on your own.
Digital certificates as a more efficient alternative to printing credentials
If you want to create a professional brand experience and give your recipients the real impression that they achieved something great – professionally printed digital credentials seem to be the first choice you come into.
However, what if there was a way to achieve the same impact with less effort? Here are some real deal-breakers to digitize credentials.
Digital certificates can be easily created, stored, and distributed electronically.
You minimize the risks of errors or misplacements that come with traditional printed certificates.
It’s possible to add interactive elements like embedded links or QR codes to boost recipient engagement.
They’re much easier to share, which is expected in the LinkedIn era.
There's no need to create bleeds, margins, and all the other stuff printing shops require.
Certificates via email last forever!
How to digitize printing certification with Certifier?
With the right certificate maker at hand, you can literally get things done in a matter of minutes. And Certifier is a tool that fits the bill.
Certifier has an intuitive user interface that allows you to create and manage multiple digital credentials with ease. The platform is equipped with a library of customizable templates, making it easy to issue professional-looking certificates without any design experience.
And at the top of it – it makes certification distribution a breeze. Just upload your recipients from any spreadsheet, such as Google Sheets, and start sending certificates with a click.
“On average, Certifier saves businesses 6 hours each week by automating certification processes”.
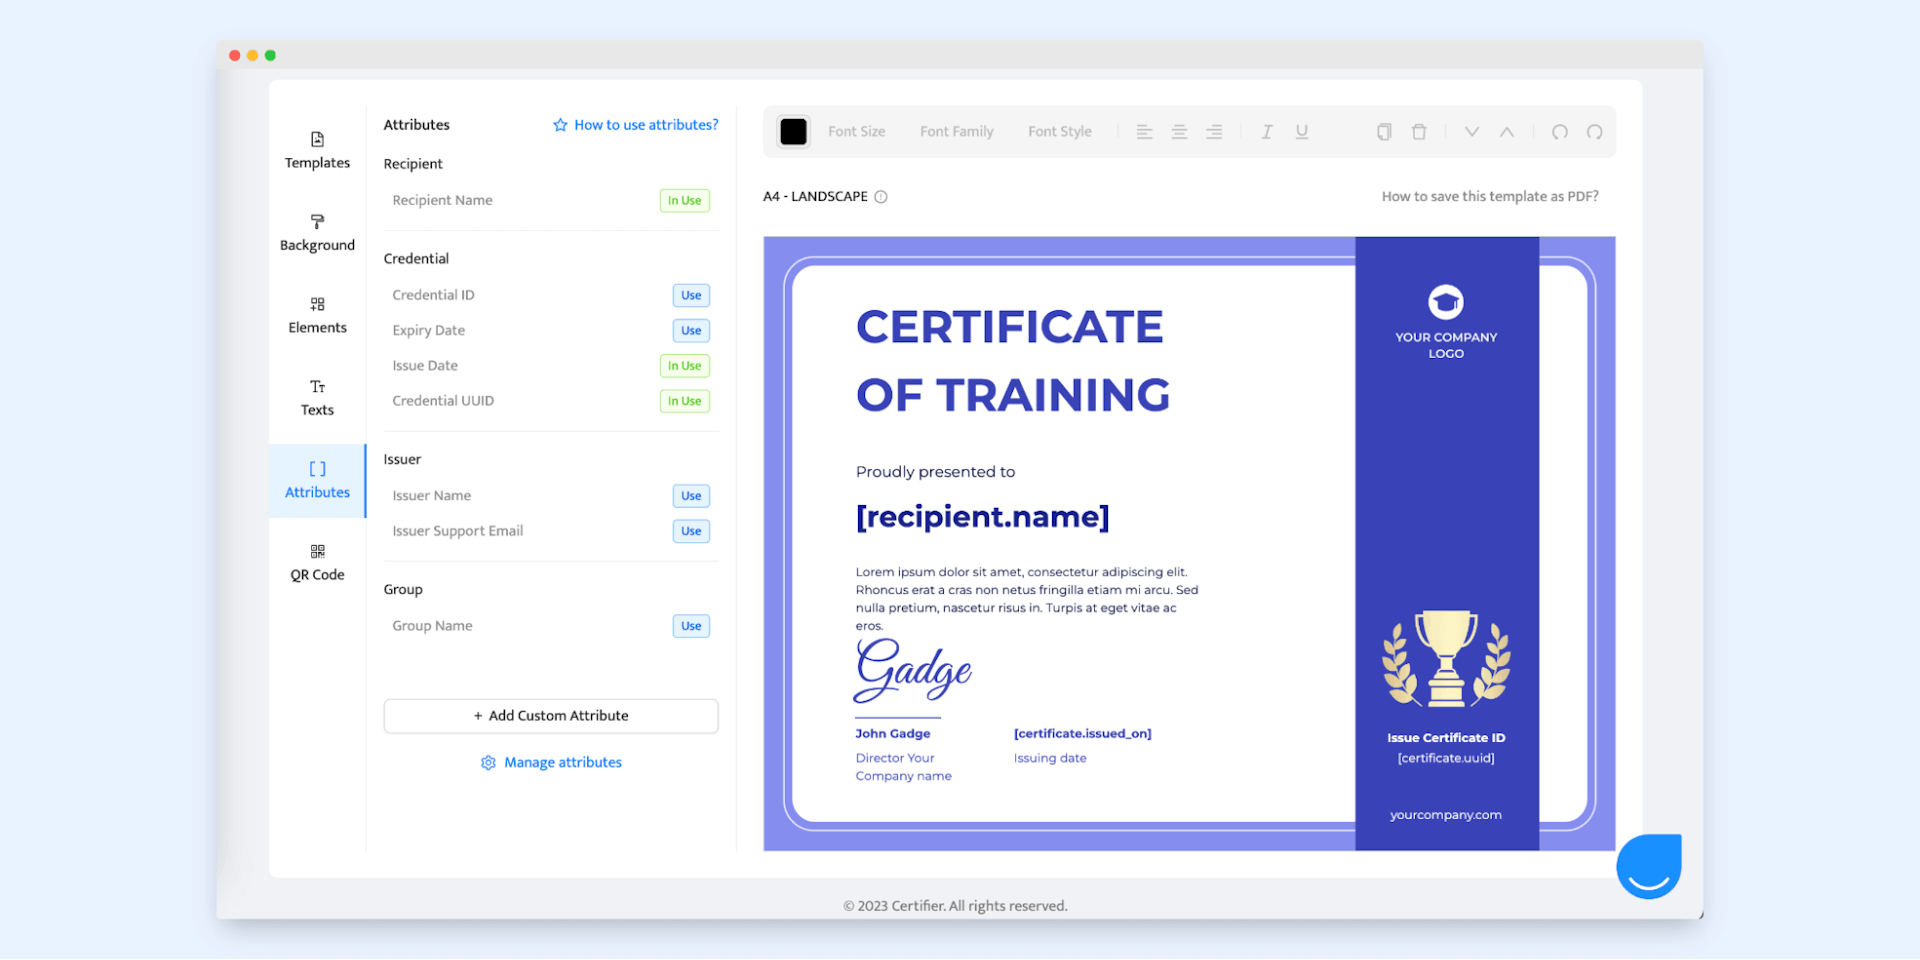
Tip! Certifier provides Dynamic Attributes. Attributes in certificate templates act as custom fields for dynamic information. For example, [recipient.name] will be replaced with the recipient's name when generating a certificate. This enables the use of one single template for multiple certification series, automatically inserting the recipient's name into each one.
So if you're looking for a way to make issuing certificates easier, faster, and more secure – Certifier is ready to handle every aspect of certificate issuance (even the analytics!). Start out now and level up your certification program!
The certificate project status: approved!
It’s done! Your online credentials have been submitted and got proof approval. After covering all the requirements and instructions above, you don't have to worry about the end results. As the last step, choose the certificate printing paper that suits your certificate best (the one that will highlight your beautiful design elements!).
And, if you want to use one of the certificate design templates, here's the Certifier templates library at your disposal. They are free to use and tinker with as you like!
Professional certificate printing: FAQs
Here are the most common questions that may occur while preparing the certificates for a professional print.
What factors should I consider when choosing a certificate paper?
Consider factors such as paper weight, texture, color, and finish when selecting certificate paper. Choose high-quality, acid-free paper for durability and elegant touch.
What are the certificate printing costs?
The cost of printing certificates depends on the size, type of paper, quantity, and other factors. Generally speaking, you can expect to pay from $0.50 to several dollars per certificate, depending on how fancy you want it to be.
What are some tips for creating a professional-looking certificate?
Your design should be clean and organized. Use high-quality, professional images or graphics in your certificate layout. Consider adding a custom logo to add an extra layer of credibility. Make sure all the text is clear and legible, as well as properly aligned and centered on the page.
How to send certificates through email?
An affordable option to send certificates via email is Certifier. It provides an easy-to-use interface, allowing you to create and send professional certificates with just a few clicks. It also lets you customize the design of your certificate with images, colors, fonts, and more. After creating your certificate, all you have to do is enter the recipient’s email address and hit “Send” - Certifier will take care of the rest.
Can I customize the design and content of my professional certification using Certifier templates and custom fields?
Absolutely. Certifier offers a range of templates for different types of certificates that you can use as the basis for your certificate design. You can also customize and add custom fields to your certificate. The Certifier interface allows you to easily create and preview your customized certificates before sending them out.

Sergey Butko
Tech entrepreneur. Forbes 30 Under 30 Europe. At Certifier, Sergey’s work focused on revolutionizing the way credentials, certificates, and badges are issued and managed through cutting-edge APIs and software infrastructure.
Sergey Butko
Tech entrepreneur. Forbes 30 Under 30 Europe. At Certifier, Sergey’s work focused on revolutionizing the way credentials, certificates, and badges are issued and managed through cutting-edge APIs and software infrastructure.
Share this article