Trusted by:
How To Make a Certificate in Certifier? 5 Easy Steps!
Do you want a professional certificate without asking developers and graphic designers to help you? Using an online certificate maker, you can create your own certificates in 5 easy steps yourself.
AuthorSergey Butko
Updated: February 20, 2024
16 min read

Author
Sergey Butko
Updated: February 20, 2024
16 min read
Trusted by:
Forget about spending hours in a random program to make a document for your webinar or course attendees. No more writing all the certificate recipients' names manually and sending emails with the document one by one.
There is a way to make your own certificates in several steps and reduce certificates’ preparation time.
Before we dive in, let's see what certificates are all about.
Take a look at the video and learn how to make a certificate in Certifier:
⬆️ Check our professional certificate maker. Create and send multiple certificates with different names! ⬆️
What are certificates?
A certificate is an official document that serves as evidence or testimony of something. They are often used to prove that a person has completed a course, program, training, or other educational milestones.
Certificates can also be used for employment purposes, such as to show that an individual has the necessary skills or qualifications for a job.
The benefits of certificates
Certificates are great for many reasons. Here are some of the most vital ones.
It makes your course or workshop stand out from the competition. Many courses or workshop organizers do not provide any kind of confirmation of completed training. Your course can be unique by including certificates.
Certificates are a reward for your participants. Rewarding the completion of courses or workshops is motivating and may impact active participation during your event.
Participants can share the certificates on social platforms. We live in the times of social media, where people love to share their achievements. Certifier enables participants to post their successes on social platforms like LinkedIn.
Also, the certificates have become a powerful marketing tool. When participants share their certificates, other people have a chance to notice your brand, and certifications make you more recognizable.
If you are interested to read more about the role of certificates in event marketing, check out this piece ➡️ The Role of Certificates in Event Marketing
Make your own certificates in 5 steps
Do you want to make certificates in minutes?
Certifier makes the whole process easy, fast, and intuitive. Here’s how.
Easy – Certifier is a user-friendly platform that is easy to work with. If you can’t figure out how something works, we have lots of articles that will help you out.
Fast – You can make and send all the certificates you want to your recipients in less than 15 minutes. Thanks to some fantastic features such as dynamic attributes, you can create a certificate chain – sending them in bulk is a walk in the park.
Intuitive – In contrast to some other certificates generator, like Google Forms, Certifier is a certificate creator primarily for creating certificates. There are only features used for making certificates. Everything is clear, and you won’t get lost.
Let’s jump into details!
Step 1. Create your account
Sign up to get started. Certifier offers a free plan as well as three paid plans. Look at the pricing and choose the best option for you.
Step 2. Make a list of recipients
Prepare a list of participants in a CSV, XLSX, or XLS file. In the first column, write the recipients’ names, and in the second column, write their email addresses. With this list, you can send the certificates with just a few clicks, thanks to dynamic attributes.
If you want to get more information, you can read more on our blog ➡️ How To Use Dynamic Attributes To Create and Send Certificates in Bulk
Step 3. Design your certificates
Now, the exciting part – designing your certificates. You can design from scratch or use our customizable pre-made templates. Then:
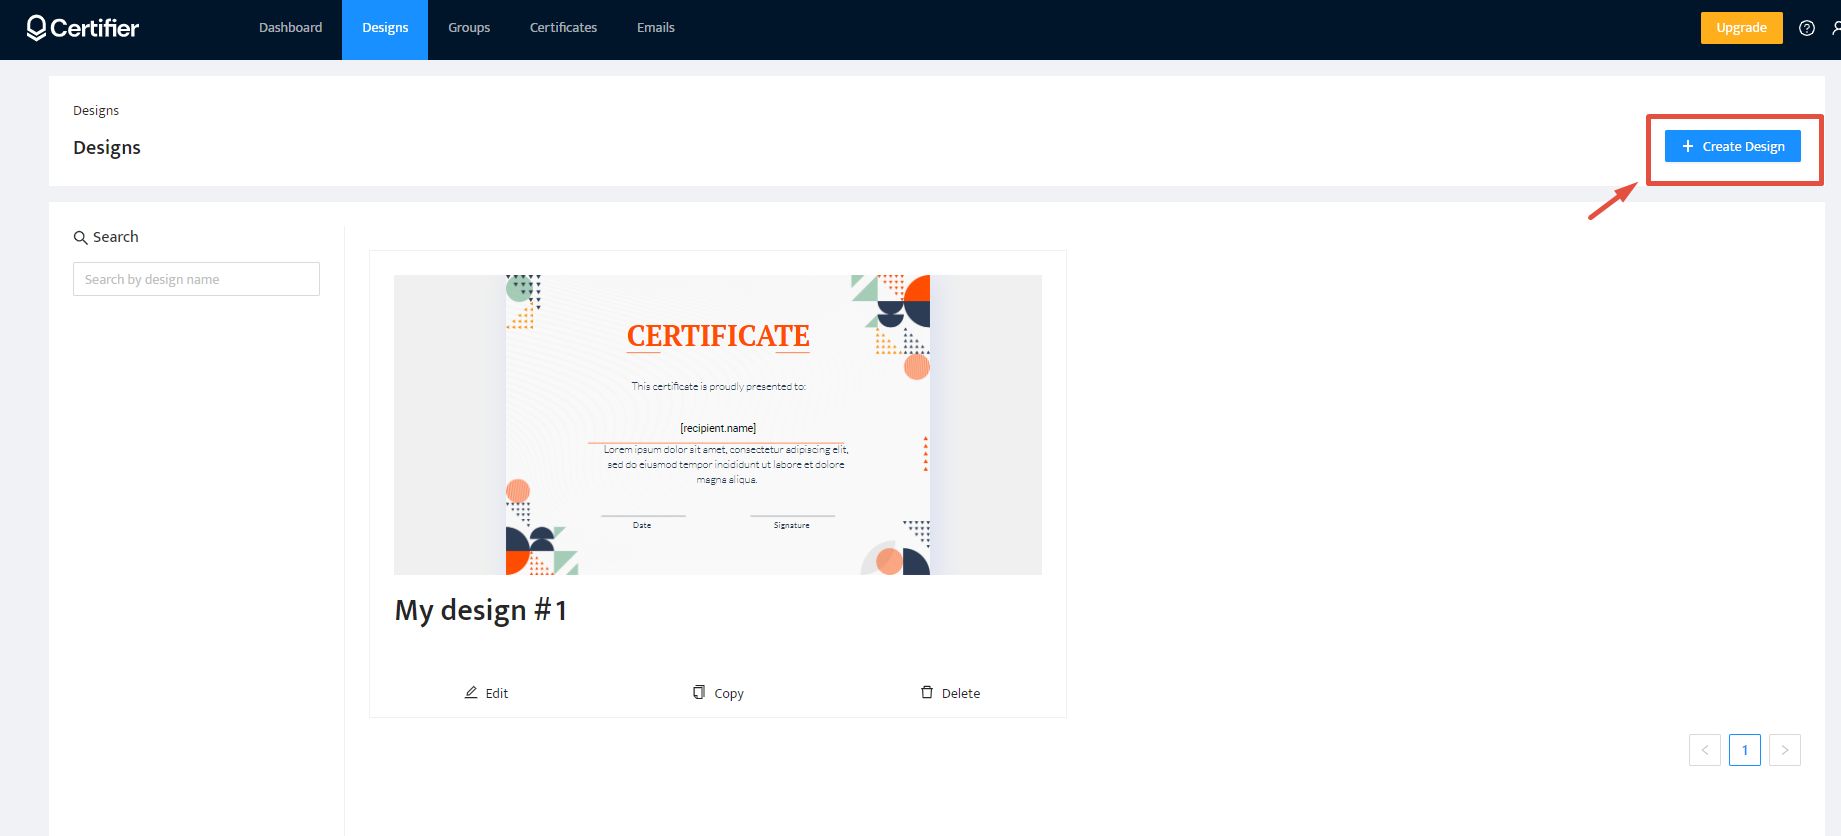
Go to the Design tab
Click on Create Design

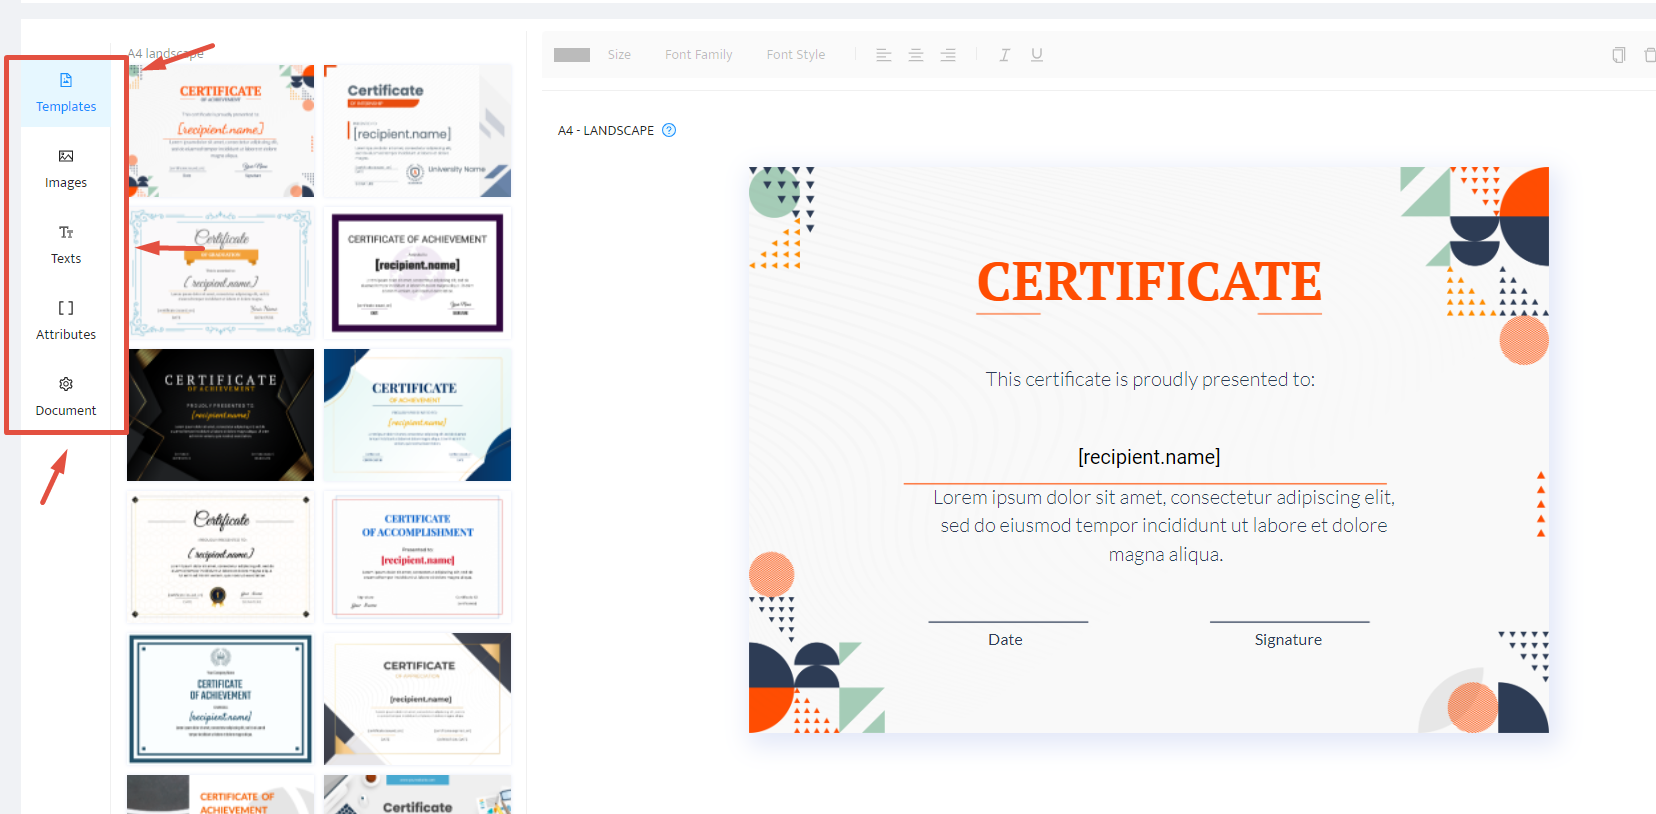
If you want to use a finished template, go through the gallery and pick up the templates you like the most. Then you can choose between different layouts - A4 landscape (horizontal) or A4 portrait (vertical). Change the font style, colors, and size as you like.
If you are determined to make beautiful certificates from scratch, go to the Images tab. You can upload your own certificate background image and some graphic elements if you need them.
If you don’t have a background, you can always choose a suitable template, remove all the elements, add your own description, and adjust everything to your needs.
In the Design tab, you will see the subtabs on the left: Images, Texts, Attributes, and Documents.

In the Images subtab, you can upload your pictures and images.
You can rewrite the ready formulas on the certificates or add a new text in the Text subtab.
In the Attributes subtab, you find the attributes you can assign to the text. As if you are giving a role to individual texts. For example, recipient name, issuer name, issue date, etc. Thanks to the ascribed attributes and previously prepared recipients’ list, you can make the certificates in minutes and send them in bulk with a customized email about getting the certificate.
In the Document subtab, you can choose the orientation and paper size.
TIP: Read all the formulas and texts at least 3 times before issuing to catch any typos or grammar mistakes.
Even if you check multiple times, there is still a tiny chance that there are some mistakes. In such cases, Certifier enables you to correct the mistakes even after sending the certificates.
Step 4. Select the group
When your certificates are designed, follow these steps:
Go to the Groups tab.
Click Create Group. This option is great if you have many groups or send finished certificates more than once to different groups.
Create a display name, select the design, and choose the email template. You can create a custom one in the Emails tab.
Step 5. Send in bulk
To send certifications, you should follow these steps:
Go to the Certificates tab.
Click Issue Certificates.
Select a group from a list.
Click Upload Recipient List.
Select I have the right to use the personal data of these recipients if participants agree to you using their data.
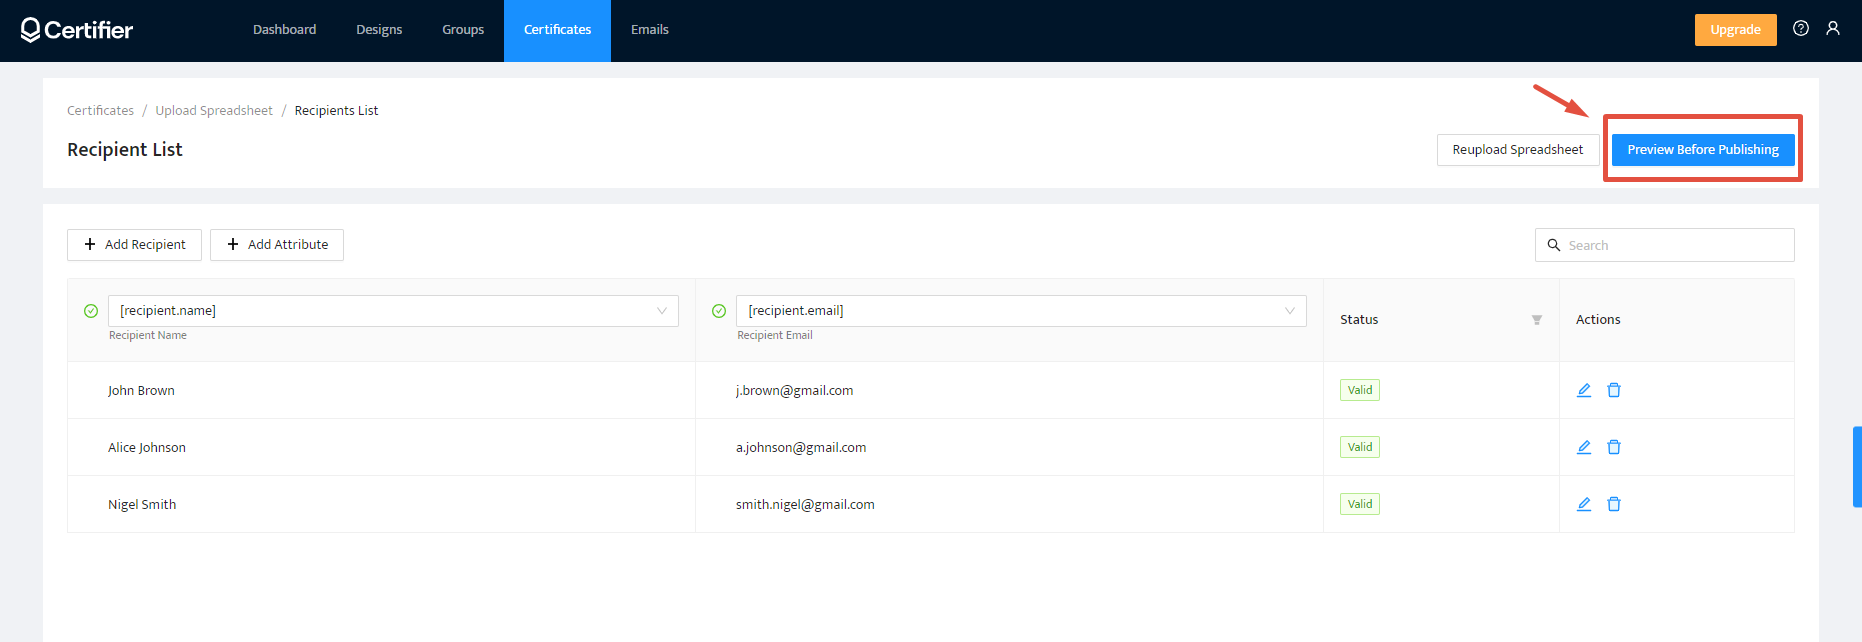
Upload the Recipient List you prepared in Step 2.
Preview before publishing.
Click Save and Publish or Save as Draft so you can publish certificates now or do it later.

In the Certificates tab, you can find certificate management options. You can download them as a PDF file, resend emails, delete and edit issued certificates, etc.
Five simple steps and digital certificates are ready to go to the recipients!
Here is a helpful certificate design checklist for you.
Why Certifier?
Certifier is one of the best certificate generators on the market. See what makes it unique.
✅ It allows generating certificates for free and provides reasonable pricing for an upgrade
This Certificate editor offers a free plan that is great for occasional, non-professional use. It is also an option for those who would like to check if Certifier is a tool for them. Also, upgrading can be done in a few seconds. A free plan offers basic editing tools such as:
Visual builder
Professional selection of certificate templates
Dynamic Attributes
Sending certificates in bulk
Printable certificate templates in PDF
Certificate Wallet - Recipients can store their certificates in the digital wallet and share them on social media
Basic statistics
You can send 50 certificates monthly
✅ Certifier is growing for you all the time
It's a tool that grows with you. We are constantly adding new features to meet the needs of our customers.
If you don’t have an account yet, click here to sign up. We will inform you via email about all the improvements.
✅ It offers marketing insight at your fingertips
Something that distinguishes Certifier from other competitors is insights into issued certificates. Thanks to the analysis, you can track your recipients’ engagements and see how many recipients receive the email with certificates, open it and share them on social media.
Additionally, you can explore generated PPC revenue. It is good to keep an eye on the statistics and monitor tendencies. With us, you can gain marketing insights to help you make further decisions backed by verifiable statistics.
✅ Certifier ensures sending emails automatically thanks to dynamic attributes
Dynamic attributes are also a fantastic feature. Thanks to them, you can send certificates in bulk to hundreds and even thousands of people in minutes. If you have ever written all the emails manually, you know how a slow and tedious task it is.
✅ Privacy and safety are provided
It is good to check how all the data is stored and if privacy is provided. Every professional certificate maker should take care of that. Certifier is equipped with privacy measures to protect personal data and secret files to avoid losing, misusing, and modifying the information.
✅ Certifier lets you create a custom email template and branding
Certifier allows you to send a customized email to the recipient with the information about receiving a certificate. The default template has a Certifier logo, heading, body text, and button. You can change any of these elements as you wish to suit your brand’s voice.
It may seem redundant but trust us, the details matter. Receiving an email like this makes a good impression of you and your brand. Also, it gives a sense that everything is buttoned up.
Not enough? Learn more here ➡️ How to Create a Custom Email Template and Branding.
Conclusion
Making a perfect certificate in 5 steps is possible and accessible with Certifier.
There are plenty of useful features that will help you create certificates on your own and send them to hundreds or even thousands of recipients.
Sign up for a free plan to make the most amazing certificates without the designer or developer but only with the help of the online certificate maker.

Sergey Butko
Tech entrepreneur. Forbes 30 Under 30 Europe. At Certifier, Sergey’s work focused on revolutionizing the way credentials, certificates, and badges are issued and managed through cutting-edge APIs and software infrastructure.
Sergey Butko
Tech entrepreneur. Forbes 30 Under 30 Europe. At Certifier, Sergey’s work focused on revolutionizing the way credentials, certificates, and badges are issued and managed through cutting-edge APIs and software infrastructure.
Share this article