Trusted by:
How to Make Certificates for Microsoft Teams?
Tired of tedious tasks to make certificates for your Microsoft Teams events? Here’s a quick tutorial on how to automate the process (with Certifier or Microsoft Power Automate).
AuthorOla Kozielska
Updated: April 08, 2024
11 min read

Author
Ola Kozielska
Updated: April 08, 2024
11 min read
Trusted by:
Good news for all Microsoft Teams event organizers out here. It’s finally time to take your workload out. You can free up event management from the manual certification process.
Here’s a quick guide on how to make certificates for Microsoft Teams via Microsoft Power Automate (or speed things up with Certifier!).
What to prepare to create certificates for Microsoft Teams?
Microsoft 365 tools aren’t designed for certificate creation. The process needs quite a few tools to make it possible to certify special achievements with professional gift certificates.
Microsoft Form to collect recipients’ details
Microsoft Word to create a certificate template
OneDrive to save digital certificates
Power Automate to create a trigger
Outlook to send certificates out
What if we told you that you can do all that with one tool:
Certifier certificate maker to create, generate, distribute, and manage from one intuitive dashboard (scroll down to get to know how).
Create and Send Digital Credentials
Take your digital certificate making to the next level.

How to create your first Microsoft Teams certificate?
We broke the process shared by down into smaller chunks to make it easier to digest. We don’t want to lie, though – the process in Power Automate is complex and might be overwhelming, especially for first-timers.
The following tutorial will walk you through creating certificates for Microsoft Teams in detail.
#1 Create a Microsoft Form
Create a Microsoft Form first.
It’s inevitable to trigger the flow and create as many certificates as you need in one go. The form will be the place where you'll gather certificate requests, recipients’ names, and email addresses.
Create a new form in Microsoft Forms.
Add fields for participant details (e.g., name, email address) and any other details that will make your certificates personal and memorable.

Before clicking “Collect responses,” verify that the form captures all necessary information for the certificate.
Check the form twice. These data will be used to generate the certificates and send the emails.
Take care of the form design. As a first interaction with your attendees, it will probably set the tone for the rest of the event. A good idea to use the form as an attendance form or for getting feedback at the end of the event. Thanks to that, you’ll be able to gather all the recipients' data needed without much effort.
Note: If you prefer, you can use an Excel spreadsheet to generate certificates instead of the form. Please remember to change the dynamic content in the flow accordingly.
#2 Prepare the certificate template in MS Word
Now, it’s time to prepare the certificate design.
Rather than spending hours creating it from scratch, you can download the ready-made template from the Certifier certificate library in MS Word format. There are multiple template designs to choose from – no matter what event you're planning, you will surely find something you like.

Download the template and upload the certificate to Microsoft Word.
Do you want to take care of every certificate detail? See our tutorial on how to create certificates in Word:
#3 Put content controls on the certificate
Before you start, you need to activate the Developer tab in your MS Word (as it’s not displayed by default).

macOS users: On the Word menu, select Preferences > Ribbon and Toolbar > Customize the Ribbon > Main Tabs. Check Developer from the dropdown menu and select Save.
Windows: On the File tab, go to Options > Customize Ribbon, and then under Main Tabs, select the Developer check box.
To make a content control, select the text and go to the Developer tab. Under the section Controls, choose the “Plain Text Content Control” icon.

Then, select Properties and give the placeholder a name and tag, e.g., FullName (add other content controls if needed).
Save the document.
#4 Create the trigger in Power Automate
Go to Power Automate.
Select Create and then choose Automated cloud flow.

Name the flow with a suitable title as we do, e.g., Certificate SEO Masterclass. And choose the flow’s trigger. Look for “When a new response is submitted.” The trigger will be activated when the attendee fills out the form.

Click create. It leads you to the flow editor page.
#5 Prepare the automated flow
Our automated flow will look as follows:
When a new response is submitted
Get response details
Populate a Microsoft Word template
Create file
(We recommend you to oversave your flow after each step).
Here are detailed steps to create it.
Click the first trigger and connect it with the form that you prepared at the beginning.

Then, click the + button and add the new step.

In the search bar, type "Get response details." Select the action.

In the Form ID choose the form that you created. In the Response ID, click the flash icon that leads you to dynamic content based on your flow – and choose the Response ID.

Click the + button again to create the next action.

Choose “Populate a Microsoft Word template.”
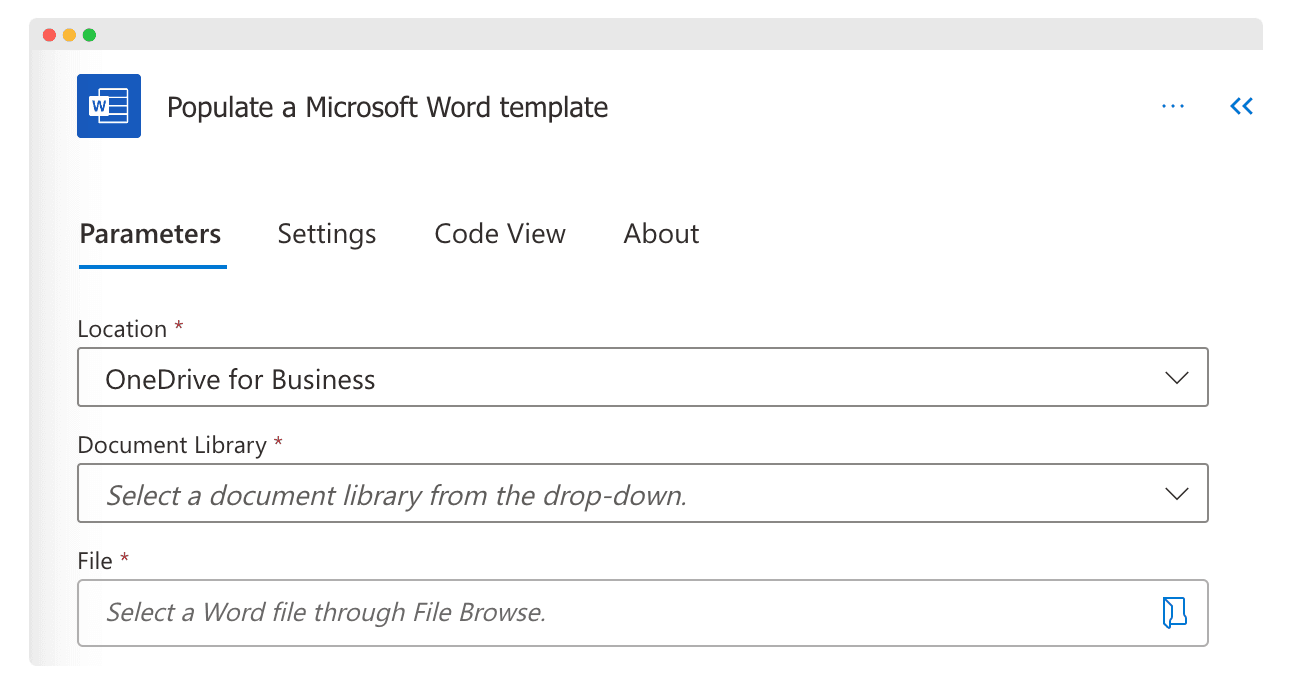
Select location: OneDrive for Business, Document Library: OneDrive, and file – the document with your certificate template.
Following that, you will see the content controls and tags that you set up in the #1 step. Connect them with the appropriate questions from the form.
Click the + button and add the next action, “Create file.”

Choose the document folder path where the certificates should land. In the File Name, choose the Full Name question from the form. In File Content, use the Microsoft Word template from the previous step.

#6 Convert Word document to PDF
If you need a certificate template PDF file, you can add other actions to the flow.
Select the + button and look for “Convert file” in the search bar. Fill out the data with dynamic content (ID in File), and use PDF as the target type.
Again, choose the + button and add the Create file action. Fill the fields with the appropriate data.
This “tail” of the flow should look as follows.

Save the flow if you don’t want to send certificates automatically.
#7 Set up bulk mail to send certificates (optional)
If you want to automate more – you can also trigger the flow by sending certificates out (for Outlook users).
Expand the existing flow with another action. Click the + button and choose Control > Condition.

In the value, look for the question with an email address from the form. Choose “is NOT equal to” and then select anonymous.
Add an action the the True condition.

Look for “Send an email (V2)” in the search bar.

In the field “To,” choose the email address from the dynamic content from the Forms. Set up the subject and body.
In advanced options > choose Attachments Name (look for the Name from the “Create file 1” step).
In Attachments Content, select File content from the Convert file bracket.
#8 Test and debug
Before you go live with your certificate system, it's important to make sure everything works just right. Think of it as a test run.

Click the Flow checker to see if everything works as it should. The software shows you any errors if they occur.
Go ahead and fill out the form yourself to see how the whole process unfolds. Check if the certificates are created correctly if they're turning into PDFs without any hiccups, and if the emails are going out with the certificates attached.
Please note: If you spot any issues, now's the time to fix them.
#9 Use the flow
As soon as you're sure your system works perfectly, it's time to put it into action. All your hard work pays off here.
Keep an eye on things as they run – to confirm that everything goes according to plan.
Alternative: Create Microsoft Teams certificates in 1 minute with Certifier
Tired and upset that the flow isn't going as planned? Certifier is here to help. The certification process can literally take you a minute!

Sign up for free and jump right into selecting a template.
Add dynamic content to your custom certificate to generate certificates in a flash.
Connect the certificate group with your Excel file that contains the answers to the form.
Give your professional certificates a quick preview to make sure everything looks good.
Use bulk mail and send your certificates out all at once with one click. Certifier even lets you track each one, so you know they've been received, opened, and shared by a certificate owner.
To get to know the process in detail, check how to create automated certificates.
Conclusion
Wrapping things up – if you make certificates for Microsoft Teams, you've got two main certification paths:
Creating complex automated flow in Power Automate
Going with Certifier intuitive certificate maker without any additional resources
If you're leaning towards a solution that offers simplicity and speed, Certifier is the clear winner. It's designed for ease of use. It allows you to quickly create, personalize, and send out certificates without getting bogged down in technical details.
Check Certifier on your own and spend less time setting up!
FAQ

Ola Kozielska
Content designer. At Certifier, Ola crafts user-friendly content that makes complex information easy to grasp.
Ola Kozielska
Content designer. At Certifier, Ola crafts user-friendly content that makes complex information easy to grasp.
Share this article