Trusted by:
How to Design a Certificate? Step by Step Guide
In this article, we will explain to you how to design certificates for your students using Certifier.
AuthorUliana Kysheniuk
Updated: March 22, 2024
9 min read

Author
Uliana Kysheniuk
Updated: March 22, 2024
9 min read
Trusted by:
Issuing certificates to your students is something more than just congratulating them on their achievements. The issued certificate is also representing your image and brand.
With this being said, the look and feel of the credentials you issue should convey the message of your school, university, webinar, or course.
In this article, we will explain to you how to design certificates for your students using Certifier.
Step 1: Sign Up and Log In to Certifier
The first thing you should do is to sign up and log in to Certifier. This step takes less than one minute. Once you are logged in, you will be automatically redirected to the Design tab and start designing your first certificate.
Step 2: Choose a Template
There are two main approaches towards designing a certificate:
1) Using a pre-made template
2) Creating a design from scratch
While creating a design from scratch is a good way to stand out, it is crucial to understand that such an approach is both cost- and time-consuming.
Thus, we suggest clicking on the Templates button under the Design tab and using a pre-made template offered by Certifier's templates library.
To choose the right template, you should always keep in mind the topic of your course/webinar/program. Having that information in your mind, you should browse the templates library and look for the samples that match your topic the most.

For example, the IT field is usually associated with minimalism, bluish colors, IT-inspired graphic elements like computers, brackets, etc.
On the other hand, issuing the certificate of arts course completion requires using bold and colorful templates.
Do not forget that the text on the templates is customizable.
Thus, if you feel like the template saying Certificate of Internship matches your marketing course the most – feel free to use it since you will be able to change the text according to your needs.

Once you have filtered the library and picked some five templates that suit your topic, you should decide which of them you like best.
Having made up your mind, you should now customize the template that you have chosen and create your first certificate design.
Step 3: Customize the text
There are two main types of text fields one can place on the template:
1) Repetitive (Issue Date, Heading, etc.) - these fields will be the same for all of your students.
2) Unique (Recipient Name, Certificate ID, etc.) - each of your students will have unique text written.
When customizing the text fields, you should start with checking whether the template you have chosen has all the text fields you have in your mind, e.g. student's name, issue date, expiry date, course name, etc.
Following this, you should filter the text fields you want to place and decide which of them are unique (these are usually the recipient name and certificate id). All the repetitive fields can be placed directly on the template just in the way you want them to be displayed.
All of the unique fields should be placed as Attributes (they are stored under the Attributes tab). Attributes make Certifier powerful: with their help, you can issue hundreds of certificates to your students with just one click.
Simply put, these are dynamic elements that get replaced with data you provide during the issuing process.
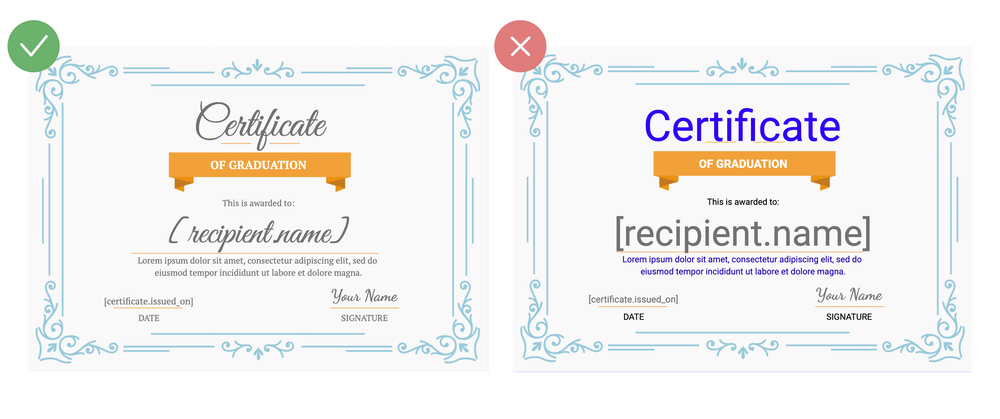 This is how differently the same certificate can look like:
- certificate on the left - fonts carefully picked and adjusted;
- certificate on the right - no consistency in terms of fonts adjustments.
Have you lost your way? The video below shows all the steps in detail:
Step 4: Customize the images
Placing the logo of your school, university, or company will give your students a branded experience. Thus, go to the Image tab to upload the logo of your company if you have one.
In addition to this, you may have some partners who assisted you in the course preparation. Thus, it is a good idea to place their logo as well when you design a certificate.
Your signature is one more graphic element you may want to place. You should simply upload a picture of your signature without a background and place it in the Signature field.

Congratulations! You have just designed your first certificate using Certifier's certificate template.
The last step is to name your certificate design and save it by hitting the Save Design button on the right upper corner.
Now you can issue your freshly designed certificates to hundreds of students in just one click!
Must-haves checklist
Go through this checklist to find out whether your certificate has all the necessary elements:
Information about the certificate issuer:
- Name of your organization
- Your logo
- Teacher's name (if applicable)
- Signature (if applicable)
- Website (if applicable)
Information about the recipient:
- Full name of a recipient ([recipient.name] attribute)
- Course/program/webinar title
- Score/mark
- Additional information about your program
Information about the issued credential:
- Document Title: certificate, diploma, confirmation, etc
- Issue date
- Expiration date (if applicable)
- Certificate ID (if applicable)
Some pieces of advice on how to design a professionally-looking certificate
- Use your brand colors.
- Do not use too many colors, try to limit yourself with three of them.
- If you feel that you are not good at design, use the template.
- Pay particular attention to white space (space without any information): there should be neither too much nor too little of it.
- Try to place your elements in a logical and symmetrical way.
- Remember that dynamic elements can take more space than you see initially: [recipient.name] attribute has 13 letters whereas a random name like Cameron Stephens which will replace the attribute has 15 letters and a white space.
- Issue test certificates first! Send them to your email, open, and see how the issued certificates look like and whether all the information is displayed in the way you planned.
As you can see, a degree in design is not required to create a beautiful certificate :)
Read more: step-by-step guide to help you create a great and effective design for your certificates in 2022
Get our free plan and see it for yourself!

Uliana Kysheniuk
Product Manager at Certifier. At Certifier, Uliana plays a pivotal role in steering the development and enhancement of digital credential software solutions.
Uliana Kysheniuk
Product Manager at Certifier. At Certifier, Uliana plays a pivotal role in steering the development and enhancement of digital credential software solutions.
Share this article